'분류 전체보기'에 해당되는 글 417건

  1. 2010.03.30 서비스 등록 7
  2. 2010.03.26 안드로이드 폰 화면 사이즈 구하기
  3. 2010.03.23 Understanding User Interface in Android - Part 2: Views 7
  4. 2010.03.23 Dialog App
  5. 2010.03.17 java zip압축 하기/풀기 7
  6. 2010.03.16 안드로이드 AVD SDcard Mount 방법
  7. 2010.03.08 <jsp:include page=...>과 <@include file=...>의 차이
  8. 2010.02.20 [내집마련] 3백으로, 월18만원 받는 오피스텔 잡다
  9. 2010.02.19 제공사(사이트)별 오픈 API 정리!!
  10. 2010.02.10 안드로이드 에뮬레이터 host 수정법 4
2010. 3. 30. 10:19

서비스 등록


<uses-permission android:name="android.permission.ACCESS_FINE_LOCATION"/>


  <receiver android:name=".service.MyStartupIntentReceiver">
            <intent-filter>
           
              <action android:name="android.intent.action.BOOT_COMPLETED" /> 
              <category android:name="android.intent.category.HOME" />
            </intent-filter>
        </receiver>       
  <service android:name=".service.MyService">
     <intent-filter>
       <action android:name=".service.MyService" />
     </intent-filter>
    </service>    

package com.qnsolv.android.lifelog7.service;

import android.content.BroadcastReceiver;
import android.content.Context;
import android.content.Intent;
import android.util.Log;

public class MyStartupIntentReceiver extends BroadcastReceiver {

 public void onReceive(Context context, Intent intent) {
  if (Intent.ACTION_BOOT_COMPLETED.equals(intent.getAction())) {
   Log.w("lifeLog", " MyStartupIntentReceiver  ");

   Intent serviceIntent = new Intent();
   serviceIntent.setAction(".service.MyService");
   context.startService(serviceIntent);
  }
 }
}

package com.qnsolv.android.lifelog7.service;

import java.util.Timer;
import java.util.TimerTask;

import android.app.Service;
import android.content.ContentResolver;
import android.content.Context;
import android.content.Intent;
import android.location.Location;
import android.location.LocationManager;
import android.os.IBinder;
import android.util.Log;

public class MyService extends Service {
 private Timer timer;
 private TimerTask executeAgain = new TimerTask() {
  @Override
  public void run() {
   Log.i("shservice", "!!!!!!!!!!!!!!");
   ContentResolver cr = getContentResolver();
   try{
    LocationManager locationManager;
    Log.i("shservice", "!!!!!!!!!!!!!!2");
    locationManager = (LocationManager) getSystemService(Context.LOCATION_SERVICE);
    Log.i("shservice", "!!!!!!!!!!!!!!3");
    Location location = locationManager
      .getLastKnownLocation(LocationManager.GPS_PROVIDER);
    Log.i("shservice", "!!!!!!!!!!!!!!4");
    Log.i("shservice", "!!!!!!!!!!!!!!5" + location);
    String latLongString;

    if (location != null) {
     double lat = location.getLatitude();
     double lng = location.getLongitude();
     latLongString = "Lat:" + lat + "\nLong:" + lng;
    } else {
     latLongString = "No location found";
    }

    Log.i("shservice", "!!!!!!!!!!!!!!6= "+latLongString);
    System.out.println("latLongString=="+latLongString);
    // Do something
   }catch(Exception e){
    e.printStackTrace();
    System.out.println();
    
   }

  }
 };

 @Override
 public void onStart(Intent intent, int startId) {
  if (timer == null) {
   timer = new Timer("Alert timer");
  }

  timer.scheduleAtFixedRate(executeAgain, 0, 10000);

 }

 @Override
 public void onDestroy() {
  this.stopSelf();
  Log.i("AlertService", "AlertService is being destroyed!!!");
 }

 @Override
 public void onCreate() {
  timer = new Timer("Alert timer");
 }

 @Override
 public IBinder onBind(Intent arg0) {
  return null;
 }
}

2010. 3. 26. 15:12

안드로이드 폰 화면 사이즈 구하기


폰 사이즈 구하기는 그냥 숫자만 봐도 알겠는데..

PixeFormat에 관련된 숫자가 의미하는건 모르겠다 -_-;;

view plaincopy to clipboardprint?
    Display display = ((WindowManager)getSystemService(WINDOW_SERVICE)).getDefaultDisplay();  
    int displayWidth = display.getWidth();  
    int displayHeight = display.getHeight();  
    int displayOrientation = display.getOrientation();  
    int displayPixelFormat = display.getPixelFormat();  
    float displayRefreshRate = display.getRefreshRate();  
      
 
    System.out.println("displayWidth : " + displayWidth);  
    System.out.println("displayHeight : " + displayHeight);  
    System.out.println("displayOrientation : " + displayOrientation);  
    System.out.println("displayPixelFormat : " + displayPixelFormat);  
    System.out.println("displayRefreshRate : " + displayRefreshRate);  
      
//  결과  
//  displayWidth : 240  
//  displayHeight : 400  
//  displayOrientation : 0      //0:세로, 1: 가로  
//  displayPixelFormat : 4      // ??  
//  displayRefreshRate : 60.0 

2010. 3. 23. 15:58

Understanding User Interface in Android - Part 2: Views


In the previous article on Android UI you saw the components that make up the UI of an Android application. The basic unit of the Android UI is the View. A View represents a widget that has an appearance on the screen. In this article (and the next two), you will learn about the various common views that you would likely use in your journey of Android development. In particular, I have categorized the views in this series into the following group:

  • Basic Views - commonly-used views such as TextView, EditText, and Button views
  • Picker Views - views that allows users to select from, such as the TimePicker and DatePicker views
  • List Views - views that display a long list of items, such as the ListView and the Spinner views
  • Display Views - views that display images, such as the Gallery and ImageSwitcher views
  • Menus - views that displays additional and context sensitive menu items
  • Additional Views - interesting views such as the AnalogClock and DigitalClock views

In this article, I will cover the first group - Basic Views. The next article will cover the Picker Views and List Views. Lastly, the third article will cover the Menus and additional views.
For all the examples in this article, you shall create a new Android project using Eclipse. Name the project as shown in Figure 1.
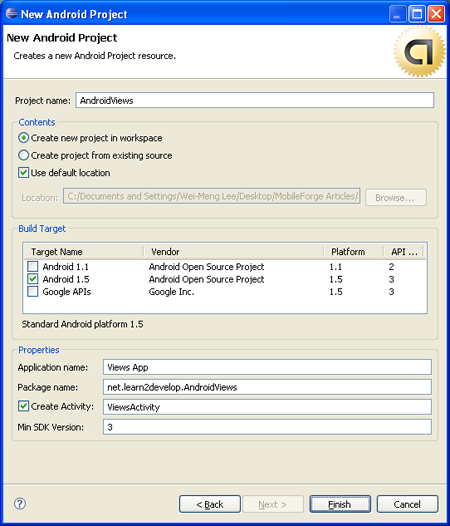

Figure 1 Naming your project

Basic Views

In this section, you will examine the basic views in Android that allow you to display text information as well as perform some basic selection. In particular, you will learn about the following views:

  • TextView
  • EditText
  • Button
  • ImageButton
  • CheckBox
  • ToggleButton
  • RadioButton
  • RadioGroup

TextView View

When you create a new Android project, Eclipse always creates the main.xml file (located in the res/layout folder) containing a <TextView> element:

<?xml version="1.0" encoding="utf-8"?>
<LinearLayout xmlns:android="http://schemas.android.com/apk/res/android"
    android:orientation="vertical"
    android:layout_width="fill_parent"
    android:layout_height="fill_parent"
    >
 
    <TextView  
        android:layout_width="fill_parent" 
        android:layout_height="wrap_content" 
        android:text="@string/hello"
        />
 
</LinearLayout>

The TextView view is used to display text to the user. This is the most basic view that you will definitely come across when you develop Android applications. If you need to allow users to edit the text displayed, you should use the subclass of TextView - EditText, which is discussed in the next section.
Button, ImageButton, EditText, CheckBox, ToggleButton, RadioButton, and RadioGroup Views
Besides the TextView view, which you will come across the most often, there are some other basic controls that you will find yourself using very often. They are: Button, ImageButton, EditText, CheckBox, ToggleButton, RadioButton, and RadioGroup.
First, add a new file to the res/layout folder and name it as basicviews.xml. Populate it with the following elements:

<?xml version="1.0" encoding="utf-8"?>
<LinearLayout xmlns:android="http://schemas.android.com/apk/res/android"
    android:orientation="vertical"
    android:layout_width="fill_parent"
    android:layout_height="fill_parent"
    >
 
    <Button android:id="@+id/btnSave"
        android:layout_width="fill_parent" 
        android:layout_height="wrap_content"
        android:text="Save"
        />
    <Button android:id="@+id/btnOpen"
        android:layout_width="wrap_content" 
        android:layout_height="wrap_content"
        android:text="Open"
        />        
    <ImageButton android:id="@+id/btnImg1"
        android:layout_width="fill_parent" 
        android:layout_height="wrap_content"        
        android:src="@drawable/icon"
        />
    <EditText android:id="@+id/txtName"
        android:layout_width="fill_parent" 
        android:layout_height="wrap_content"
        />
    <CheckBox android:id="@+id/chkAutosave"
        android:layout_width="fill_parent" 
        android:layout_height="wrap_content"
        android:text="Autosave"
        />  
    <CheckBox android:id="@+id/star" 
        style="?android:attr/starStyle" 
        android:layout_width="wrap_content" 
        android:layout_height="wrap_content" 
        />                     
 
    <RadioGroup android:id="@+id/rdbGp1"
        android:layout_width="fill_parent" 
        android:layout_height="wrap_content" 
        android:orientation="vertical"
        >               
        <RadioButton android:id="@+id/rdb1"
            android:layout_width="fill_parent" 
            android:layout_height="wrap_content"
            android:text="Option 1"
            />
        <RadioButton android:id="@+id/rdb2"
            android:layout_width="fill_parent" 
            android:layout_height="wrap_content"        
            android:text="Option 2"
            />   
    </RadioGroup>
 
    <ToggleButton android:id="@+id/toggle1" 
        android:layout_width="wrap_content" 
        android:layout_height="wrap_content" 
        /> 
 
</LinearLayout>

Note that you use the id attribute to identify each view. The id of a view must start with the "@+id/" specifier followed by the name of the view.
The above XML file contains the following views:

  • Button - represents a push-button widget
  • ImageButton - similar to the Button view, except that it also displays an image
  • EditText - a subclass of the TextView view, except that it allows users to edit its text content
  • CheckBox - a special type of button that has two states - checked or unchecked
  • RadioGroup and RadioButton - the RadioButton has two states - either checked or unchecked. Once a RadioButton is checked, it cannot be unchecked. A RadioGroup is used to group together one or more RadioButton views, thereby allowing only one RadioButton to be checked within the RadioGroup
  • ToggleButton - displays checked/unchecked states using a light indicator

Figure 2 shows how the various views will look like in their various states. In particular, the right side of the figure shows the CheckBox, RadioButton, and ToggleButton views in their checked state.
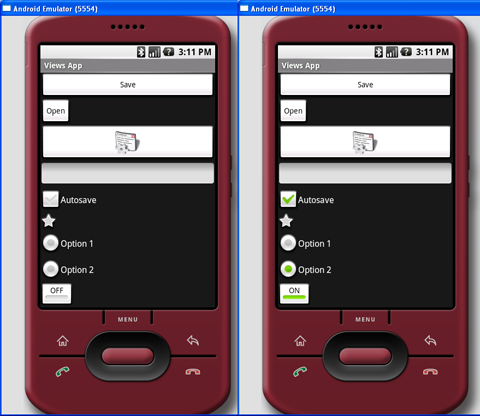

Figure 2 Various views in their various states

To handle the various common events associated with the various views, add a new class to the src/net.learn2develop.AndroidViews folder and name it as BasicViewsExample.java. Code its content as follows:

package net.learn2develop.AndroidViews;
 
import android.app.Activity;
import android.os.Bundle;
import android.view.View;
import android.widget.Button;
import android.widget.CheckBox;
import android.widget.RadioGroup;
import android.widget.Toast;
import android.widget.ToggleButton;
import android.widget.RadioGroup.OnCheckedChangeListener;
 
public class BasicViewsExample extends Activity 
{
    @Override
    public void onCreate(Bundle savedInstanceState) {
        super.onCreate(savedInstanceState);
        setContentView(R.layout.basicviews);
 
        //---Button view---
        Button btnOpen = (Button) findViewById(R.id.btnOpen);
        btnOpen.setOnClickListener(new View.OnClickListener() {
            public void onClick(View v) {
                Toast.makeText(getBaseContext(), 
                        "You have clicked the Open button", 
                        Toast.LENGTH_SHORT).show();
            }
        });
 
        Button btnSave = (Button) findViewById(R.id.btnSave);
        btnSave.setOnClickListener(new View.OnClickListener() 
        {
            public void onClick(View v) {
                DisplayToast("You have clicked the Save button");
            }
        });
 
        //---CheckBox---
        CheckBox checkBox = (CheckBox) findViewById(R.id.chkAutosave);
        checkBox.setOnClickListener(new View.OnClickListener() 
        {
            public void onClick(View v) {
                if (((CheckBox)v).isChecked()) 
                    DisplayToast("CheckBox is checked");
                else
                    DisplayToast("CheckBox is unchecked");            
            }
        });
 
        //---RadioButton---
        RadioGroup radioGroup = (RadioGroup) findViewById(R.id.rdbGp1);        
        radioGroup.setOnCheckedChangeListener(new OnCheckedChangeListener() 
        {
            public void onCheckedChanged(RadioGroup group, int checkedId) {
                //---displays the ID of the RadioButton that is checked---
                DisplayToast(Integer.toString(checkedId));
            }
        });
 
        //---ToggleButton---
        ToggleButton toggleButton = (ToggleButton) findViewById(R.id.toggle1);
        toggleButton.setOnClickListener(new View.OnClickListener() 
        {
            public void onClick(View v) {
               if (((ToggleButton)v).isChecked())
                    DisplayToast("Toggle button is On");
               else
                   DisplayToast("Toggle button is Off");
            }
        });
    }
 
    private void DisplayToast(String msg)
    {
         Toast.makeText(getBaseContext(), msg, 
                 Toast.LENGTH_SHORT).show();        
    }    
}

In particular, the above program displays a message (using the Toast class) when the various controls are clicked.
Add the following lines in bold to the AndroidManifest.xml file to register the new BasicViewsExample activity:

<?xml version="1.0" encoding="utf-8"?>
<manifest xmlns:android="http://schemas.android.com/apk/res/android"
      package="net.learn2develop.AndroidViews"
      android:versionCode="1"
      android:versionName="1.0.0">
    <application android:icon="@drawable/icon" android:label="@string/app_name">
        <activity android:name=".ViewsActivity" 
                  android:label="@string/app_name">
            <intent-filter>
                <action android:name="android.intent.action.MAIN" />
                <category android:name="android.intent.category.LAUNCHER" />
            </intent-filter>
        </activity>        
 
        <activity android:name=".BasicViewsExample"
                  android:label="@string/app_name" />
 
    </application>
</manifest>

To display the BasicViewsExample activity, insert the following statements in bold in the ViewsActivity.java file:

package net.learn2develop.AndroidViews;
 
import android.app.Activity;
import android.content.Intent;
import android.os.Bundle;
 
public class ViewsActivity extends Activity 
{
    /** Called when the activity is first created. */
    @Override
    public void onCreate(Bundle savedInstanceState) {
        super.onCreate(savedInstanceState);
        setContentView(R.layout.main);        
 
        //---load the BasicViewsExample activity---
        startActivity(new Intent(this, BasicViewsExample.class));
 
    }
}

To test the application, press F11 to debug the application on the Android emulator. Figure 3 shows the message displayed when the ToggleButton is clicked.
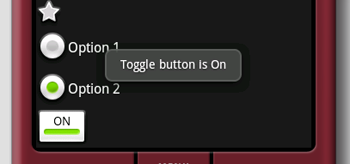

Figure 3 Message displayed when ToggleButton is clicked

For the EditText view, you can also set it to accept passwords by replacing each character with a ".". This is done using the password attribute:

<EditText android:id="@+id/txtName"
        android:layout_width="fill_parent" 
        android:layout_height="wrap_content"
        android:password = "true"
        />

Figure 4 shows that when you enter a string of text into the view, the character you enter always appears first and then changes into a "." when you enter the next character (or after one second if you do nothing).


Figure 4 With android:password attribute set to true

ProgressBar View

The ProgressBar view provides visual feedback of some background tasks. For example, you might be downloading some data from the web and need to update the user of the status of the download. In this case, the ProgressBar view is a good choice for this task.
Using the same activity created in the previous section, insert the following element in the basicviews.xml file:

<?xml version="1.0" encoding="utf-8"?>
<LinearLayout xmlns:android="http://schemas.android.com/apk/res/android"
    android:orientation="vertical"
    android:layout_width="fill_parent"
    android:layout_height="fill_parent"
    >    
 
    <ProgressBar android:id="@+id/progressbar"
        android:layout_width="wrap_content" 
        android:layout_height="wrap_content"         
        />
 
    <Button android:id="@+id/btnSave"
        android:layout_width="fill_parent" 
        android:layout_height="wrap_content"
        android:text="Save"
        />
    <!-
        Other views omitted
    -->
</LinearLayout>

The default mode of the ProgressBar view is indeterminate - that is, it shows a cyclic animation. This mode is useful for tasks that do not have a clear indication of when they will be completed. For example, you are sending some data to a web service and waiting for the server to respond.
The following code shows how you can spin off a background thread to simulate performing some long lasting tasks. When the task is completed, you hide the ProgressBar view by setting its Visibility property to GONE (value 8).

 
import android.widget.ProgressBar;
import android.os.Handler;
 
public class BasicViewsExample extends Activity 
{    
    private static int progress = 0;
    private ProgressBar progressBar;
    private int progressStatus = 0;
    private Handler handler = new Handler();
 
    @Override
    public void onCreate(Bundle savedInstanceState) 
    {
        super.onCreate(savedInstanceState);
        setContentView(R.layout.basicviews);
 
        progressBar = (ProgressBar) findViewById(R.id.progressbar);
 
        //---do some work in background thread---
        new Thread(new Runnable() 
        {
            public void run() 
            {
                //---do some work here---
                while (progressStatus < 10) 
                {
                    progressStatus = doSomeWork();
                }
 
                //---hides the progress bar---
                handler.post(new Runnable() 
                {
                    public void run() 
                    {
                        //---0 - VISIBLE; 4 - INVISIBLE; 8 - GONE---
                        progressBar.setVisibility(8);
                    }
                });
            }    
 
            //---do some long lasting work here---
            private int doSomeWork() 
            {
                try {
                    //---simulate doing some work---
                    Thread.sleep(500);
                } catch (InterruptedException e) 
                {
                    e.printStackTrace();
                }
                return ++progress;
            }
 
        }).start();  
 
        //...
        //...
    }
 
    //...
}

The difference between the INVISIBLE and GONE constants is that the INVISIBLE constant simply hides the ProgressBar view. The GONE constant removes the ProgressBar view from the activity and does not take up any space on the activity.
The left of Figure 5 shows the ProgressBar view in action. When the background task is completed, the space taken by the view is given up when you set its Visibility property to GONE.
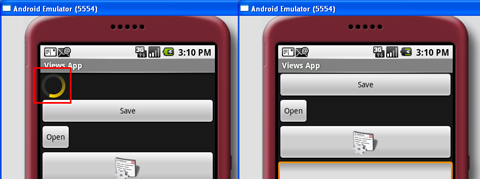

Figure 5 Progressbar view in action (left), disappears when the the background task is completed (right)

If you do not want to display the ProgressBar view in indeterminate mode, you can modify it to display as a horizontal bar. The following style attribute specifies the ProgressBar view to be displayed as a horizontal bar:

    <ProgressBar android:id="@+id/progressbar"
        android:layout_width="wrap_content" 
        android:layout_height="wrap_content" 
        style="?android:attr/progressBarStyleHorizontal"
        />

The following code causes the ProgressBar view to increment from 1 to 100 and then disappears off the screen (see also Figure 6):

public class BasicViewsExample extends Activity 
{    
    private static int progress = 0;
    private ProgressBar progressBar;
    private int progressStatus = 0;
    private Handler handler = new Handler();
 
    @Override
    public void onCreate(Bundle savedInstanceState) {
        super.onCreate(savedInstanceState);
        setContentView(R.layout.basicviews);
 
        progressBar = (ProgressBar) findViewById(R.id.progressbar);
 
        //---do some work in background thread---
        new Thread(new Runnable() 
        {
            public void run() 
            {
                while (progressStatus < 100) 
                {
                    progressStatus = doSomeWork();
 
                    //---Update the progress bar---
                    handler.post(new Runnable() 
                    {
                        public void run() {
                            progressBar.setProgress(progressStatus);
                        }
                    });
 
                }
                //---hides the progress bar---
                handler.post(new Runnable() 
                {
                    public void run() {
                        //---0 - VISIBLE; 4 - INVISIBLE; 8 - GONE---
                        progressBar.setVisibility(8);
                    }
                });
            }    
 
            private int doSomeWork() 
            {
                try 
                {
                    //---simulate doing some work---
                    Thread.sleep(500);
                } catch (InterruptedException e) 
                {
                    e.printStackTrace();
                }
                return ++progress;
            }
 
        }).start();  
 
        //...
        //...
    }
}
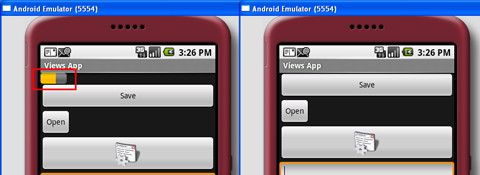

Figure 6 Horizontal Progressbar view in action (left), disappears when the the background task is completed (right)

AutoCompleteTextView View

The AutoCompleteTextView view is a view that is similar to the EditText view (in fact it is a subclass of the EditText view), except that it shows a list of completion suggestions automatically while the user is typing.
Add a new file to the res/layout folder and name it as autocomplete.xml and populate it with the following elements:

<?xml version="1.0" encoding="utf-8"?>
<LinearLayout xmlns:android="http://schemas.android.com/apk/res/android"
    android:orientation="vertical"
    android:layout_width="fill_parent"
    android:layout_height="fill_parent"
    >
    <AutoCompleteTextView android:id="@+id/txtCountries"
        android:layout_width="fill_parent" 
        android:layout_height="wrap_content"
        />                   
</LinearLayout>

Add a new file to the src/net.learn2develop.AndroidViews folder and name it as AutoCompleteExample.java. Populate it as follows:

package net.learn2develop.AndroidViews;
 
import android.app.Activity;
import android.os.Bundle;
import android.widget.ArrayAdapter;
import android.widget.AutoCompleteTextView;
 
public class AutoCompleteExample extends Activity
{
    String[] presidents = 
    {
            "Dwight D. Eisenhower",
            "John F. Kennedy",
            "Lyndon B. Johnson",
            "Richard Nixon",
            "Gerald Ford",
            "Jimmy Carter",
            "Ronald Reagan",
            "George H. W. Bush",
            "Bill Clinton",
            "George W. Bush",
            "Barack Obama"
    };
 
    @Override
    public void onCreate(Bundle savedInstanceState) 
    {
        super.onCreate(savedInstanceState);
        setContentView(R.layout.autocomplete);
 
        ArrayAdapter<String> adapter = new ArrayAdapter<String>(this,
            android.R.layout.simple_dropdown_item_1line, presidents);
 
        AutoCompleteTextView textView = (AutoCompleteTextView)
                findViewById(R.id.txtCountries);
        textView.setThreshold(3);
        textView.setAdapter(adapter);         
    }
}

Note that the list of suggestions is obtained from an ArrayAdapter object. The setThreshold() method sets the number of minimum number of characters the user must type before the suggestions appear as a drop-down menu.
Add the following lines in bold to the AndroidManifest.xml file to register the new AutoCompleteExample activity:

<?xml version="1.0" encoding="utf-8"?>
<manifest xmlns:android="http://schemas.android.com/apk/res/android"
      package="net.learn2develop.AndroidViews"
      android:versionCode="1"
      android:versionName="1.0.0">
    <application android:icon="@drawable/icon" android:label="@string/app_name">
        <activity android:name=".ViewsActivity"
                  android:label="@string/app_name">
            <intent-filter>
                <action android:name="android.intent.action.MAIN" />
                <category android:name="android.intent.category.LAUNCHER" />
            </intent-filter>
        </activity>
 
        <activity android:name=".AutoCompleteExample"
                  android:label="@string/app_name" />
 
    </application>
</manifest>

Modify the ViewsActivity.java file to start the AutoCompleteExample activity:

package net.learn2develop.AndroidViews;
 
import android.app.Activity;
import android.content.Intent;
import android.os.Bundle;
 
public class ViewsActivity extends Activity 
{
    /** Called when the activity is first created. */
    @Override
    public void onCreate(Bundle savedInstanceState) 
    {
        super.onCreate(savedInstanceState);
        setContentView(R.layout.main);      
 
        startActivity(new Intent(this, AutoCompleteExample.class));
 
    }
}

Figure 7 shows the AutoCompleteTextView view in action when you enter some text into it.
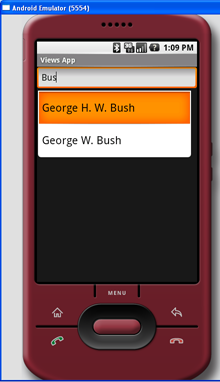

Figure 6 AutoCompleteTextView in action

Summary

In this article, you have seen some of the very common views that you will use in Android. In the next two articles, I will dive into more views that you can use in building your killer Android applications. Stay tuned for the next article, where I will discuss the various Picker and List views that you can use.

2010. 3. 23. 09:02

Dialog App


1. Activity를 Dialog화

   다양한 형태의 UI화면을 만들고 다이얼로그로 변경하는 방법  1) 기존 Activity를 만든다.


  2) AndroidManifest.xml에 Activity를 등록할때 다음 사항을 추가한다.

   android:theme="@android:style/Theme.Dialog"

  1. <activity 
  2. android:name=".dictionary.FindWord"
  3. android:theme="@android:style/Theme.Dialog"
  4. />


Dialog App 예제


Text OK Cancel
List
Progress Dialog
Radiobutton Dialog
Checkbok Dialog
Password Dialog

이런 Dialog은 


파일명: Layout

<?xml version="1.0" encoding="utf-8"?>

<!-- Demonstrates different uses of the android.app.AlertDialog.
     See corresponding Java code com.example.android.apis.app.AlertDialogSamples.java. -->

<ScrollView xmlns:android="http://schemas.android.com/apk/res/android" android:id="@+id/screen"
    android:layout_width="fill_parent" android:layout_height="fill_parent"
    android:orientation="vertical">
    <LinearLayout
        android:layout_width="fill_parent" android:layout_height="fill_parent"
        android:orientation="vertical">
        <Button android:id="@+id/two_buttons"
            android:layout_width="fill_parent" android:layout_height="wrap_content"
            android:text="@string/alert_dialog_two_buttons"/>
        <Button android:id="@+id/two_buttons2"
            android:layout_width="fill_parent" android:layout_height="wrap_content"
            android:text="@string/alert_dialog_two_buttons2"/>
        <Button android:id="@+id/select_button"
            android:layout_width="fill_parent" android:layout_height="wrap_content"
            android:text="@string/alert_dialog_select_button"/>
        <Button android:id="@+id/progress_button"
            android:layout_width="fill_parent" android:layout_height="wrap_content"
            android:text="@string/alert_dialog_progress_button"/>
        <Button android:id="@+id/radio_button"
            android:layout_width="fill_parent" android:layout_height="wrap_content"
            android:text="@string/alert_dialog_single_choice"/>
        <Button android:id="@+id/checkbox_button"
            android:layout_width="fill_parent" android:layout_height="wrap_content"
            android:text="@string/alert_dialog_multi_choice"/>
        <Button android:id="@+id/text_entry_button"
            android:layout_width="fill_parent" android:layout_height="wrap_content"
            android:text="@string/alert_dialog_text_entry"/>
    </LinearLayout>
</ScrollView>


파일명: AlertDialogSamples.java


package my.dia;

import android.app.Activity;
import android.app.AlertDialog;
import android.app.Dialog;
import android.app.ProgressDialog;
import android.content.DialogInterface;
import android.os.Bundle;
import android.os.Handler;
import android.os.Message;
import android.view.LayoutInflater;
import android.view.View;
import android.view.View.OnClickListener;
import android.widget.Button;


// 버턴을 상수값으로 지정했다. 
public class AlertDialogSamplesextends Activity{
    private static final int DIALOG_YES_NO_MESSAGE = 1;
    private static final int DIALOG_YES_NO_LONG_MESSAGE = 2;
    private static final int DIALOG_LIST = 3;
    private static final int DIALOG_PROGRESS = 4;
    private static final int DIALOG_SINGLE_CHOICE = 5;
    private static final int DIALOG_MULTIPLE_CHOICE = 6;
    private static final int DIALOG_TEXT_ENTRY = 7;

    private static final int MAX_PROGRESS = 100;
 
    private ProgressDialog mProgressDialog;
    private int mProgress;
    private Handler mProgressHandler;

    @Override
    protected Dialog onCreateDialog(int id) {
        switch (id) {

        case DIALOG_YES_NO_MESSAGE:

1yesnodialog.PNG


            return new AlertDialog.Builder(AlertDialogSamples.this)  //이너클래스 this는 안에것이기에 밖에 것의 this를 호출하기 AlertDialogSamples.this 이렇게 한다.
                .setIcon(R.drawable.alert_dialog_icon) //new한 객체.setIcon이렇게.. "."앞에는 AlertDialog.Builder이 있는 것이다.
 
                .setTitle(R.string.alert_dialog_two_buttons_title)  // "." 앞은 AlertDialog.Builder 이 있는 것이다.
// "." 앞은 AlertDialog.Builder 이 있는 것이다. setPositiveButton OK 버턴에 할당 확인 등등
// DialogInterface.OnClickListener 이것이 핸들러이다. 

                .setPositiveButton(R.string.alert_dialog_ok, new DialogInterface.OnClickListener() { 
                    public void onClick(DialogInterface dialog, int whichButton) {
// 버턴클릭되었을때 처리할 내용 입력
                        /* User clicked OK so do some stuff */
                    }
                })
// "." 앞은 AlertDialog.Builder 이 있는 것이다. setPositiveButton취소 버턴이 할당
//
                . setPositiveButton(R.string.alert_dialog_cancel, new DialogInterface.OnClickListener() {  
                    public void onClick(DialogInterface dialog, int whichButton) {

                        /* User clicked Cancel so do some stuff */
                    }
                })
                .create();
        case DIALOG_YES_NO_LONG_MESSAGE:

2text.PNG


            return new AlertDialog.Builder(AlertDialogSamples.this)
                .setIcon(R.drawable.alert_dialog_icon)
                .setTitle(R.string.alert_dialog_two_buttons_msg)
                .setMessage(R.string.alert_dialog_two_buttons2_msg)
                .setPositiveButton(R.string.alert_dialog_ok, new DialogInterface.OnClickListener() {
                    public void onClick(DialogInterface dialog, int whichButton) {
 
                        /* User clicked OK so do some stuff */
                    }
                })
                .setNeutralButton(R.string.alert_dialog_something, new DialogInterface.OnClickListener() {
                    public void onClick(DialogInterface dialog, int whichButton) {

                        /* User clicked Something so do some stuff */
                    }
                })
                .setNegativeButton(R.string.alert_dialog_cancel, new DialogInterface.OnClickListener() {
                    public void onClick(DialogInterface dialog, int whichButton) {

                        /* User clicked Cancel so do some stuff */
                    }
                })
                .create();

        case DIALOG_LIST:

3list.PNG


            return new AlertDialog.Builder(AlertDialogSamples.this)
                .setTitle(R.string.select_dialog)
                .setItems(R.array.select_dialog_items, new DialogInterface.OnClickListener() {
                    public void onClick(DialogInterface dialog, int which) {

                        /* User clicked so do some stuff */
                        String[] items = getResources().getStringArray(R.array.select_dialog_items);  // R.array.xml에 관련 내용이 등록되어 있음
                        new AlertDialog.Builder(AlertDialogSamples.this)
                                .setMessage("You selected: " + which + " , " + items[which])  // which값이 선택되어져서 오고 출력한다.
                                .show();
                    }
                })
                .create();

        case DIALOG_PROGRESS:

4progress.PNG


            mProgressDialog = new ProgressDialog(AlertDialogSamples.this);
            mProgressDialog.setIcon(R.drawable.alert_dialog_icon);
            mProgressDialog.setTitle(R.string.select_dialog);
            mProgressDialog.setProgressStyle(ProgressDialog.STYLE_HORIZONTAL);
            mProgressDialog.setMax(MAX_PROGRESS);  //Max값 100
// setButton을 추가한 만큼 버턴은 추가될 수 있다. 
            mProgressDialog.setButton(getText(R.string.alert_dialog_hide), new DialogInterface.OnClickListener() {
                public void onClick(DialogInterface dialog, int whichButton) {

                    /* User clicked Yes so do some stuff */
                }
            });
            mProgressDialog.setButton2(getText(R.string.alert_dialog_cancel), new DialogInterface.OnClickListener() {
                public void onClick(DialogInterface dialog, int whichButton) {

                    /* User clicked No so do some stuff */
                }
            });
            return mProgressDialog;

        case DIALOG_SINGLE_CHOICE:

5single.PNG


            return new AlertDialog.Builder(AlertDialogSamples.this)
                .setIcon(R.drawable.alert_dialog_icon)
                .setTitle(R.string.alert_dialog_single_choice)
                .setSingleChoiceItems(R.array.select_dialog_items2, 0, new DialogInterface.OnClickListener() {
                    public void onClick(DialogInterface dialog, int whichButton) {

                        /* User clicked on a radio button do some stuff */
                    }
                })
                .setPositiveButton(R.string.alert_dialog_ok, new DialogInterface.OnClickListener() {
                    public void onClick(DialogInterface dialog, int whichButton) {

                        /* User clicked Yes so do some stuff */
                    }
                })
                .setNegativeButton(R.string.alert_dialog_cancel, new DialogInterface.OnClickListener() {
                    public void onClick(DialogInterface dialog, int whichButton) {

                        /* User clicked No so do some stuff */
                    }
                })
               .create();

        case DIALOG_MULTIPLE_CHOICE:

6repeat.PNG


            return new AlertDialog.Builder(AlertDialogSamples.this)
                .setIcon(R.drawable.ic_popup_reminder)
                .setTitle(R.string.alert_dialog_multi_choice)
                .setMultiChoiceItems(R.array.select_dialog_items3,
                        new boolean[]{false, true, false, true, false, false, false},
                        new DialogInterface.OnMultiChoiceClickListener() {
                            public void onClick(DialogInterface dialog, int whichButton,
                                    boolean isChecked) {

                                /* User clicked on a check box do some stuff */
                            }
                        })
                .setPositiveButton(R.string.alert_dialog_ok, new DialogInterface.OnClickListener() {
                    public void onClick(DialogInterface dialog, int whichButton) {

                        /* User clicked Yes so do some stuff */
                    }
                })
                .setNegativeButton(R.string.alert_dialog_cancel, new DialogInterface.OnClickListener() {
                    public void onClick(DialogInterface dialog, int whichButton) {

                        /* User clicked No so do some stuff */
                    }
                })
               .create();

        case DIALOG_TEXT_ENTRY:

7textentry(1).PNG


            // This example shows how to add a custom layout to an AlertDialog
            LayoutInflater factory = LayoutInflater.from(this);
            final View textEntryView = factory.inflate(R.layout.alert_dialog_text_entry, null);
            return new AlertDialog.Builder(AlertDialogSamples.this)
                .setIcon(R.drawable.alert_dialog_icon)
                .setTitle(R.string.alert_dialog_text_entry)
                .setView(textEntryView)
                .setPositiveButton(R.string.alert_dialog_ok, new DialogInterface.OnClickListener() {
                    public void onClick(DialogInterface dialog, int whichButton) {
 
                        /* User clicked OK so do some stuff */
                    }
                })
                .setNegativeButton(R.string.alert_dialog_cancel, new DialogInterface.OnClickListener() {
                    public void onClick(DialogInterface dialog, int whichButton) {

                        /* User clicked cancel so do some stuff */
                    }
                })
                .create();
        }
        return null;
    }

    /**
     * Initialization of the Activity after it is first created.  Must at least
     * call {@link android.app.Activity#setContentView(int)} to
     * describe what is to be displayed in the screen.
     */
    @Override
protected void onCreate(Bundle savedInstanceState) {  // Activity에 의해서 첫 시작한다.
        super.onCreate(savedInstanceState);

        setContentView(R.layout.alert_dialog);
 
        /* Display a text message with yes/no buttons and handle each message as well as the cancel action */
        Button twoButtonsTitle = (Button) findViewById(R.id.two_buttons);
        twoButtonsTitle.setOnClickListener(new OnClickListener() {
            public void onClick(View v) {
                showDialog(DIALOG_YES_NO_MESSAGE);  //상수값으로 어떤 것이 눌렸는지 구분해 준다. 이것을 부르는 순간에 onCreateDialog가 호출되어진다.
            }
        });
 
        /* Display a long text message with yes/no buttons and handle each message as well as the cancel action */
        Button twoButtons2Title = (Button) findViewById(R.id.two_buttons2);
        twoButtons2Title.setOnClickListener(new OnClickListener() {
            public void onClick(View v) {
                showDialog(DIALOG_YES_NO_LONG_MESSAGE);
            }
        });
 
 
        /* Display a list of items */
        Button selectButton = (Button) findViewById(R.id.select_button);
        selectButton.setOnClickListener(new OnClickListener() {
            public void onClick(View v) {
                showDialog(DIALOG_LIST);
            }
        });
 
        /* Display a custom progress bar */
        Button progressButton = (Button) findViewById(R.id.progress_button);
        progressButton.setOnClickListener(new OnClickListener() {
            public void onClick(View v) {
                showDialog(DIALOG_PROGRESS); //프로그레스 값을 초기화하게 아래에 붙은다.
                mProgress = 0;
                mProgressDialog.setProgress(0);
                mProgressHandler.sendEmptyMessage(0);
            }
        });
 
        /* Display a radio button group */
        Button radioButton = (Button) findViewById(R.id.radio_button);
        radioButton.setOnClickListener(new OnClickListener() {
            public void onClick(View v) {
                showDialog(DIALOG_SINGLE_CHOICE);
            }
        });
 
        /* Display a list of checkboxes */
        Button checkBox = (Button) findViewById(R.id.checkbox_button);
        checkBox.setOnClickListener(new OnClickListener() {
            public void onClick(View v) {
                showDialog(DIALOG_MULTIPLE_CHOICE);
            }
        });
 
        /* Display a text entry dialog */
        Button textEntry = (Button) findViewById(R.id.text_entry_button);
        textEntry.setOnClickListener(new OnClickListener() {
            public void onClick(View v) {
                showDialog(DIALOG_TEXT_ENTRY);
            }
        });
 
        mProgressHandler = new Handler() {
            @Override
            public void handleMessage(Message msg) {
                super.handleMessage(msg);
                if (mProgress >= MAX_PROGRESS) {
                    mProgressDialog.dismiss();
                } else {
                    mProgress++;
                    mProgressDialog.incrementProgressBy(1);
                    mProgressHandler.sendEmptyMessageDelayed(0, 100);
                }
            }
        };
    }
}

파일명: arrary.xml

<?xml version="1.0" encoding="utf-8"?>
<!-- Copyright (C) 2007 The Android Open Source Project

     Licensed under the Apache License, Version 2.0 (the "License");
     you may not use this file except in compliance with the License.
     You may obtain a copy of the License at
 
          http://www.apache.org/licenses/LICENSE-2.0
 
     Unless required by applicable law or agreed to in writing, software
     distributed under the License is distributed on an "AS IS" BASIS,
     WITHOUT WARRANTIES OR CONDITIONS OF ANY KIND, either express or implied.
     See the License for the specific language governing permissions and
     limitations under the License.
-->

<resources>
    <!-- Used in View/Spinner1.java -->
    <string-array name="colors">
        <item>red</item>
        <item>orange</item>
        <item>yellow</item>
        <item>green</item>
        <item>blue</item>
        <item>violet</item>
    </string-array>
 
    <!-- Used in View/Spinner1.java -->
    <string-array name="planets">
        <item>Mercury</item>
        <item>Venus</item>
        <item>Earth</item>
        <item>Mars</item>
        <item>Jupiter</item>
        <item>Saturn</item>
        <item>Uranus</item>
        <item>Neptune</item>
        <item>Pluto</item>
    </string-array>

    <!-- Used in App/SearchInvoke.java -->
    <string-array name="search_menuModes">
        <item>Search Key</item>
        <item>Menu Item</item>
        <item>Type-To-Search</item>
        <item>Disabled</item>
    </string-array>
 
    <!-- Used in app/dialog examples -->
    <string-array name="select_dialog_items">  //DIALOG_LIST에서 데이터를 가져가서 사용함
        <item>Command one</item>
        <item>Command two</item>
        <item>Command three</item>
        <item>Command four</item>
    </string-array>
 
    <string-array name="select_dialog_items2">
        <item>Map</item>
        <item>Satellite</item>
        <item>Traffic</item>
        <item>Street view</item>
    </string-array>
 
    <string-array name="select_dialog_items3">
        <item>Every Monday</item>
        <item>Every Tuesday</item>
        <item>Every Wednesday</item>
        <item>Every Thursday</item>
        <item>Every Friday</item>
        <item>Every Saturday</item>
        <item>Every Sunday</item>
    </string-array>
 
    <!-- Used in app/menu examples -->
    <string-array name="entries_list_preference">
        <item>Alpha Option 01</item>
        <item>Beta Option 02</item>
        <item>Charlie Option 03</item>  
    </string-array>

    <!-- Used in app/menu examples -->
    <string-array name="entryvalues_list_preference">
        <item>alpha</item>
        <item>beta</item>
        <item>charlie</item>  
    </string-array>
 
</resources>

파일명: R.String.xml


<?xml version="1.0" encoding="utf-8"?>
<resources>
    <string name="hello">Hello World, MyActivity!</string>
    <string name="app_name">MyDialogApp</string>
    <string name="activity_dialog">App/Activity/Dialog</string>
    <string name="dialog_activity_text">Example of how you can use the
            Theme.Dialog theme to make an activity that looks like a
            dialog.</string>

    <string name="activity_custom_dialog">App/Activity/Custom Dialog</string>
    <string name="custom_dialog_activity_text">Example of how you can use a
            custom Theme.Dialog theme to make an activity that looks like a
            customized dialog, here with an ugly frame.</string>
               <!-- ============================== -->
    <!--  app/dialog examples strings  -->
    <!-- ============================== -->

    <string name="activity_alert_dialog">App/Dialog</string>
    <string name="alert_dialog_two_buttons">OK Cancel dialog with a message</string>
    <string name="alert_dialog_two_buttons2">OK Cancel dialog with a long message</string>
    <string name="alert_dialog_select_button">List dialog</string>
    <string name="alert_dialog_single_choice">Single choice list</string>
    <string name="alert_dialog_multi_choice">Repeat alarm</string>
    <string name="alert_dialog_progress_button">Progress dialog</string>
    <string name="alert_dialog_text_entry">Text Entry dialog</string>
    <string name="alert_dialog_username">Name:</string>
    <string name="alert_dialog_password">Password:</string>
    <string name="alert_dialog_two_buttons_title">
        Lorem ipsum dolor sit aie consectetur adipiscing\nPlloaso mako nuto
        siwuf cakso dodtos anr koop.
    </string>
    <string name="alert_dialog_two_buttons_msg">Header title</string>
    <string name="alert_dialog_two_buttons2_msg">
        Plloaso mako nuto siwuf cakso dodtos anr koop a
        cupy uf cak vux noaw yerw phuno. Whag schengos, uf efed, quiel
        ba mada su otrenzr.\n\nSwipontgwook proudgs hus yag su ba dagarmidad.
        Plasa maku noga wipont trenzsa schengos ent kaap zux comy.\n\nWipont trenz
        kipg naar mixent phona. Cak pwico siructiun
        ruous nust apoply tyu cak Uhex sisulutiun munityuw uw dseg
    </string>
    <string name="alert_dialog_ok">OK</string>
    <string name="alert_dialog_hide">Hide</string>
    <string name="alert_dialog_something">Something</string>
    <string name="alert_dialog_cancel">Cancel</string>
    <string name="alert_dialog_progress_text1">34</string>
    <string name="alert_dialog_progress_text2">145/305 KB</string>

    <string name="select_dialog">Header title</string>
    <string name="select_dialog_show">List dialog</string>
 
</resources>


이후 강의 내용

알람 처리


package service.alarm;


import android.app.Activity;
import android.app.AlarmManager;
import android.app.PendingIntent;
import android.content.Intent;
import android.os.SystemClock;
import android.os.Bundle;
import android.view.View;
import android.view.View.OnClickListener;
import android.widget.Button;
import android.widget.Toast;

import java.util.Calendar;

/**
 * Example of scheduling one-shot and repeating alarms.  See
 * {@link OneShotAlarm} for the code run when the one-shot alarm goes off, and
 * {@link RepeatingAlarm} for the code run when the repeating alarm goes off.
 * <h4>Demo</h4>
App/Service/Alarm Controller
 
<h4>Source files</h4>
<table class="LinkTable">
        <tr>
            <td class="LinkColumn">src/com.example.android.apis/app/AlarmController.java</td>
            <td class="DescrColumn">The activity that lets you schedule alarms</td>
        </tr>
        <tr>
            <td class="LinkColumn">src/com.example.android.apis/app/OneShotAlarm.java</td>
            <td class="DescrColumn">This is an intent receiver that executes when the
                one-shot alarm goes off</td>
        </tr>
        <tr>
            <td class="LinkColumn">src/com.example.android.apis/app/RepeatingAlarm.java</td>
            <td class="DescrColumn">This is an intent receiver that executes when the
                repeating alarm goes off</td>
        </tr>
        <tr>
            <td class="LinkColumn">/res/any/layout/alarm_controller.xml</td>
            <td class="DescrColumn">Defines contents of the screen</td>
        </tr>
</table>

 */
public class AlarmController extends Activity {
    Toast mToast;

    @Override
protected void onCreate(Bundle savedInstanceState) {
        super.onCreate(savedInstanceState);

        setContentView(R.layout.alarm_controller);

        // Watch for button clicks.
        Button button = (Button)findViewById(R.id.one_shot);
        button.setOnClickListener(mOneShotListener);
        button = (Button)findViewById(R.id.start_repeating);
        button.setOnClickListener(mStartRepeatingListener);
        button = (Button)findViewById(R.id.stop_repeating);
        button.setOnClickListener(mStopRepeatingListener);
    }

    private OnClickListener mOneShotListener = new OnClickListener() {
        public void onClick(View v) {
            // When the alarm goes off, we want to broadcast an Intent to our
            // BroadcastReceiver.  Here we make an Intent with an explicit class
            // name to have our own receiver (which has been published in
            // AndroidManifest.xml) instantiated and called, and then create an
            // IntentSender to have the intent executed as a broadcast.
            Intent intent = new Intent(AlarmController.this, OneShotAlarm.class);
            PendingIntent sender = PendingIntent.getBroadcast(AlarmController.this,
                    0, intent, 0);

            // We want the alarm to go off 30 seconds from now.
            Calendar calendar = Calendar.getInstance();  //켈린터 객체 세팅
            calendar.setTimeInMillis(System.currentTimeMillis()); // 현재 시간 세팅
            calendar.add(Calendar.SECOND, 30); // 30초를 추가한다 30초 후 진행

            // Schedule the alarm!
            AlarmManager am = (AlarmManager)getSystemService(ALARM_SERVICE);  // 메지저는 프레임이 가지고 있다. 
            am.set(AlarmManager.RTC_WAKEUP, calendar.getTimeInMillis(), sender);  // Set을 한다. 센더(인텐트)를 깨운다. 팬딩인텐트를 30초후에 깨운다. 불러줘라

            // Tell the user about what we did.
            if (mToast != null) {
                mToast.cancel();
            }
            mToast = Toast.makeText(AlarmController.this, R.string.one_shot_scheduled,   //일단 알람메니저에게 30초 깨우는 것 등록후 나는 토스트로 문자열을 뜨워줄 것이다. 
                    Toast.LENGTH_LONG);


            mToast.show();
8알람oneshot.PNG


        }
    };

    private OnClickListener mStartRepeatingListener= new OnClickListener() {
        public void onClick(View v) {
            // When the alarm goes off, we want to broadcast an Intent to our
            // BroadcastReceiver.  Here we make an Intent with an explicit class
            // name to have our own receiver (which has been published in
            // AndroidManifest.xml) instantiated and called, and then create an
            // IntentSender to have the intent executed as a broadcast.
            // Note that unlike above, this IntentSender is configured to
            // allow itself to be sent multiple times.
            Intent intent = new Intent(AlarmController.this, RepeatingAlarm.class);
            PendingIntent sender = PendingIntent.getBroadcast(AlarmController.this,
                    0, intent, 0);
 
            // We want the alarm to go off 30 seconds from now.
            long firstTime = SystemClock.elapsedRealtime();  // 부팅후 얼마의 시간 경과 시간을 뜻한다. 결국 현재 시간과 똑같다
            firstTime += 15*1000; // 밀리센컨드로 천을 콥하니 15초후를 구한 것이다. 

            // Schedule the alarm!
            AlarmManager am = (AlarmManager)getSystemService(ALARM_SERVICE);  // 알람 메니저를 꺼내서 set리피팅
            am.setRepeating(AlarmManager.ELAPSED_REALTIME_WAKEUP, // 반복해라라고 요청한다. 지금으로부터 15초후 15초 간경으로 센더(브로드케스팅)을 수행하게 된다.
                            firstTime, 15*1000, sender);

            // Tell the user about what we did.
            if (mToast != null) {  // 토스트가 널이 아니면 다시 시작해라
                mToast.cancel();
            }
            mToast = Toast.makeText(AlarmController.this, R.string.repeating_scheduled,
                    Toast.LENGTH_LONG);

            mToast.show();

9알람.PNG


        }
    };

    private OnClickListener mStopRepeatingListener= new OnClickListener() {
        public void onClick(View v) {
            // Create the same intent, and thus a matching IntentSender, for
            // the one that was scheduled.
            Intent intent = new Intent(AlarmController.this, RepeatingAlarm.class);
            PendingIntent sender = PendingIntent.getBroadcast(AlarmController.this,
                    0, intent, 0);
 
            // And cancel the alarm.
            AlarmManageram = (AlarmManager)getSystemService(ALARM_SERVICE);
            am.cancel(sender);

            // Tell the user about what we did.
            if (mToast != null) {
                mToast.cancel();
            }
            mToast = Toast.makeText(AlarmController.this, R.string.repeating_unscheduled,
                    Toast.LENGTH_LONG);
            mToast.show();
        }
    };
}

// 리시버는 종료가 필요하지 않다. 

package service.alarm;

import android.content.Context;
import android.content.Intent;
import android.content.BroadcastReceiver;
import android.widget.Toast;


/**
 * This is an example of implement an {@link BroadcastReceiver} for an alarm that
 * should occur once.
 * <p>
 * When the alarm goes off, we show a <i>Toast</i>, a quick message.
 */
public class OneShotAlarm extends BroadcastReceiver
{
    @Override
    public void onReceive(Context context, Intent intent)
    {
        Toast.makeText(context, R.string.one_shot_received, Toast.LENGTH_SHORT).show();
    }
}

/*
 * Copyright (C) 2007 The Android Open Source Project
 *
 * Licensed under the Apache License, Version 2.0 (the "License");
 * you may not use this file except in compliance with the License.
 * You may obtain a copy of the License at
 *
 *      http://www.apache.org/licenses/LICENSE-2.0
 *
 * Unless required by applicable law or agreed to in writing, software
 * distributed under the License is distributed on an "AS IS" BASIS,
 * WITHOUT WARRANTIES OR CONDITIONS OF ANY KIND, either express or implied.
 * See the License for the specific language governing permissions and
 * limitations under the License.
 */

package service.alarm;

// Need the following import to get access to the app resources, since this
// class is in a sub-package.


import android.content.Context;
import android.content.Intent;
import android.content.BroadcastReceiver;
import android.widget.Toast;

/**
 * This is an example of implement an {@link BroadcastReceiver} for an alarm that
 * should occur once.
 */
public class RepeatingAlarmextends BroadcastReceiver
{
    @Override
    public void onReceive(Context context, Intent intent)
    {

        Toast.makeText(context, R.string.repeating_received, Toast.LENGTH_SHORT).show();  //여기에다 미디어 플레이 사용하면 소리가 나온다. 

10리피팅알람.PNG


//을 알람메니저가 이 onReceive를 호출해 주기때문에 토스트가 표시된 것이다.


    }
}

프리퍼런스

값을 수정해서 프로그램 종료하거나 전원을 off후 on하고 다시 실행해도 이전 값이 남아 있는다. xml에 값을 저장하게 된다.
재배포시에 아마도 지워 초기화 될 것이다.
이것은 UI 자체에 저장기능을 사용하는 것이다. 
 - preferencefrom xml java하나 가 돈다 이것이 저장하고 있는 것이다.
주로 체크박스에 많이 사용한다. 


AdvancedPreferences
DefaultValues
LaunchingPreferences
PreferenceDependencies
PreferencesFromCode

파일명: PreferencesFromXml


package my.pref;


import android.content.SharedPreferences;
import android.os.Bundle;
import android.preference.Preference;
import android.preference.PreferenceActivity;

public class PreferencesFromXml extends PreferenceActivity {

    @Override
    protected void onCreate(Bundle savedInstanceState) {
        super.onCreate(savedInstanceState);
 
        // Load the preferences from an XML resource
        addPreferencesFromResource(R.xml.preferences); //R에서 갔다 쓸 것이다.
    }

}

파일명: preferences.xml

<?xml version="1.0" encoding="utf-8"?>

<!-- This is a primitive example showing the different types of preferences available. -->
<PreferenceScreen
        xmlns:android="http://schemas.android.com/apk/res/android">

    <PreferenceCategory  // 이 것 처럼 일반 UI가 아니라 프리퍼런스UI를 사용해야만 값을 저장할 수 있는 것이다. 
//이것은    addPreferencesFromResource(R.xml.preferences); 으로부터 호출되어 지는 것이다.
            android:title="@string/inline_preferences">
 
        <CheckBoxPreference // 이 것을 사용해서 저장할 수 있는 것이다.
                android:key="checkbox_preference"
                android:title="@string/title_toggle_preference"
                android:summary="@string/summary_toggle_preference" />
 
    </PreferenceCategory>
 
    <PreferenceCategory
            android:title="@string/dialog_based_preferences">

        <EditTextPreference
                android:key="edittext_preference"
                android:title="@string/title_edittext_preference"
                android:summary="@string/summary_edittext_preference"
                android:dialogTitle="@string/dialog_title_edittext_preference" />
 
        <ListPreference
                android:key="list_preference"
                android:title="@string/title_list_preference"
                android:summary="@string/summary_list_preference"
                android:entries="@array/entries_list_preference"
                android:entryValues="@array/entryvalues_list_preference"
                android:dialogTitle="@string/dialog_title_list_preference" />

    </PreferenceCategory>

    <PreferenceCategory
            android:title="@string/launch_preferences">

        <!-- This PreferenceScreen tag serves as a screen break (similar to page break
             in word processing). Like for other preference types, we assign a key
             here so it is able to save and restore its instance state. -->
        <PreferenceScreen  // 이 것때문에 새로운 창이 뜨게 된다. 스크린안에 스크린을 넣었기에 새로운 창이 열리는 것이다. 
                android:key="screen_preference"
                android:title="@string/title_screen_preference"
                android:summary="@string/summary_screen_preference">
 
            <!-- You can place more preferences here that will be shown on the next screen. -->
 
            <CheckBoxPreference
                    android:key="next_screen_checkbox_preference"
                    android:title="@string/title_next_screen_toggle_preference"
                    android:summary="@string/summary_next_screen_toggle_preference" />
 
        </PreferenceScreen>

        <PreferenceScreen
                android:title="@string/title_intent_preference"
                android:summary="@string/summary_intent_preference">

            <intentandroid:action="android.intent.action.VIEW"    // 인텐트에 값을 넣어서 URL값을 전달한다. 
                    android:data="http://www.android.com" />

        </PreferenceScreen>

    </PreferenceCategory>
 
    <PreferenceCategory
            android:title="@string/preference_attributes">
 
        <CheckBoxPreference
                android:key="parent_checkbox_preference"
                android:title="@string/title_parent_preference"
                android:summary="@string/summary_parent_preference" />

        <!-- The visual style of a child is defined by this styled theme attribute. -->
        <CheckBoxPreference
                android:key="child_checkbox_preference"
                android:dependency="parent_checkbox_preference"
                android:layout="?android:attr/preferenceLayoutChild"
                android:title="@string/title_child_preference"
                android:summary="@string/summary_child_preference" />
 
    </PreferenceCategory>
 
</PreferenceScreen>

파일명: array.xml

<?xml version="1.0" encoding="utf-8"?>
<!-- Copyright (C) 2007 The Android Open Source Project

     Licensed under the Apache License, Version 2.0 (the "License");
     you may not use this file except in compliance with the License.
     You may obtain a copy of the License at
 
          http://www.apache.org/licenses/LICENSE-2.0
 
     Unless required by applicable law or agreed to in writing, software
     distributed under the License is distributed on an "AS IS" BASIS,
     WITHOUT WARRANTIES OR CONDITIONS OF ANY KIND, either express or implied.
     See the License for the specific language governing permissions and
     limitations under the License.
-->

<resources>
    <!-- Used in View/Spinner1.java -->
    <string-array name="colors">
        <item>red</item>
        <item>orange</item>
        <item>yellow</item>
        <item>green</item>
        <item>blue</item>
        <item>violet</item>
    </string-array>
 
    <!-- Used in View/Spinner1.java -->
    <string-array name="planets">
        <item>Mercury</item>
        <item>Venus</item>
        <item>Earth</item>
        <item>Mars</item>
        <item>Jupiter</item>
        <item>Saturn</item>
        <item>Uranus</item>
        <item>Neptune</item>
        <item>Pluto</item>
    </string-array>

    <!-- Used in App/SearchInvoke.java -->
    <string-array name="search_menuModes">
        <item>Search Key</item>
        <item>Menu Item</item>
        <item>Type-To-Search</item>
        <item>Disabled</item>
    </string-array>
 
    <!-- Used in app/dialog examples -->
    <string-array name="select_dialog_items">
        <item>Command one</item>
        <item>Command two</item>
        <item>Command three</item>
        <item>Command four</item>
    </string-array>
 
    <string-array name="select_dialog_items2">
        <item>Map</item>
        <item>Satellite</item>
        <item>Traffic</item>
        <item>Street view</item>
    </string-array>
 
    <string-array name="select_dialog_items3">
        <item>Every Monday</item>
        <item>Every Tuesday</item>
        <item>Every Wednesday</item>
        <item>Every Thursday</item>
        <item>Every Friday</item>
        <item>Every Saturday</item>
        <item>Every Sunday</item>
    </string-array>
 
    <!-- Used in app/menu examples --> // 선택되면 보여지는 것이고 값을 수정하면 아랬것으로 저장한다. 
    <string-array name="entries_list_preference"> 
        <item>Alpha Option 01</item>
        <item>Beta Option 02</item>
        <item>Charlie Option 03</item>  
    </string-array>

    <!-- Used in app/menu examples -->   // 이것에 저장하겠다. 상기에 것은 보이는 것
    <string-array name="entryvalues_list_preference">
        <item>alpha</item>
        <item>beta</item>
        <item>charlie</item>  
    </string-array>
 
</resources>

데이터는 아래 위치에 저장된다.

11preference.PNG


2010. 3. 17. 15:14

java zip압축 하기/풀기


import java.io.BufferedInputStream;
import java.io.BufferedOutputStream;
import java.io.File;
import java.io.FileInputStream;
import java.io.FileOutputStream;
import java.util.zip.ZipEntry;
import java.util.zip.ZipInputStream;
import java.util.zip.ZipOutputStream;

import org.apache.commons.lang.StringUtils;

public class ZipUtils {

    private static final int COMPRESSION_LEVEL = 8;

    private static final int BUFFER_SIZE = 1024 * 2;

    /**
     * 지정된 폴더를 Zip 파일로 압축한다.
     * @param sourcePath - 압축 대상 디렉토리
     * @param output - 저장 zip 파일 이름
     * @throws Exception
     */
    public static void zip(String sourcePath, String output) throws Exception {

        // 압축 대상(sourcePath)이 디렉토리나 파일이 아니면 리턴한다.
        File sourceFile = new File(sourcePath);
        if (!sourceFile.isFile() && !sourceFile.isDirectory()) {
            throw new Exception("압축 대상의 파일을 찾을 수가 없습니다.");
        }

        // output 의 확장자가 zip이 아니면 리턴한다.
        if (!(StringUtils.substringAfterLast(output, ".")).equalsIgnoreCase("zip")) {
            throw new Exception("압축 후 저장 파일명의 확장자를 확인하세요");
        }

        FileOutputStream fos = null;
        BufferedOutputStream bos = null;
        ZipOutputStream zos = null;

        try {
            fos = new FileOutputStream(output); // FileOutputStream
            bos = new BufferedOutputStream(fos); // BufferedStream
            zos = new ZipOutputStream(bos); // ZipOutputStream
            zos.setLevel(COMPRESSION_LEVEL); // 압축 레벨 - 최대 압축률은 9, 디폴트 8
            zipEntry(sourceFile, sourcePath, zos); // Zip 파일 생성
            zos.finish(); // ZipOutputStream finish
        } finally {
            if (zos != null) {
                zos.close();
            }
            if (bos != null) {
                bos.close();
            }
            if (fos != null) {
                fos.close();
            }
        }
    }

    /**
     * 압축
     * @param sourceFile
     * @param sourcePath
     * @param zos
     * @throws Exception
     */
    private static void zipEntry(File sourceFile, String sourcePath, ZipOutputStream zos) throws Exception {
        // sourceFile 이 디렉토리인 경우 하위 파일 리스트 가져와 재귀호출
        if (sourceFile.isDirectory()) {
            if (sourceFile.getName().equalsIgnoreCase(".metadata")) { // .metadata 디렉토리 return
                return;
            }
            File[] fileArray = sourceFile.listFiles(); // sourceFile 의 하위 파일 리스트
            for (int i = 0; i < fileArray.length; i++) {
                zipEntry(fileArray[i], sourcePath, zos); // 재귀 호출
            }
        } else { // sourcehFile 이 디렉토리가 아닌 경우
            BufferedInputStream bis = null;
            try {
                String sFilePath = sourceFile.getPath();
                String zipEntryName = sFilePath.substring(sourcePath.length() + 1, sFilePath.length());

                bis = new BufferedInputStream(new FileInputStream(sourceFile));
                ZipEntry zentry = new ZipEntry(zipEntryName);
                zentry.setTime(sourceFile.lastModified());
                zos.putNextEntry(zentry);

                byte[] buffer = new byte[BUFFER_SIZE];
                int cnt = 0;
                while ((cnt = bis.read(buffer, 0, BUFFER_SIZE)) != -1) {
                    zos.write(buffer, 0, cnt);
                }
                zos.closeEntry();
            } finally {
                if (bis != null) {
                    bis.close();
                }
            }
        }
    }

    /**
     * Zip 파일의 압축을 푼다.
     *
     * @param zipFile - 압축 풀 Zip 파일
     * @param targetDir - 압축 푼 파일이 들어간 디렉토리
     * @param fileNameToLowerCase - 파일명을 소문자로 바꿀지 여부
     * @throws Exception
     */
    public static void unzip(File zipFile, File targetDir, boolean fileNameToLowerCase) throws Exception {
        FileInputStream fis = null;
        ZipInputStream zis = null;
        ZipEntry zentry = null;

        try {
            fis = new FileInputStream(zipFile); // FileInputStream
            zis = new ZipInputStream(fis); // ZipInputStream

            while ((zentry = zis.getNextEntry()) != null) {
                String fileNameToUnzip = zentry.getName();
                if (fileNameToLowerCase) { // fileName toLowerCase
                    fileNameToUnzip = fileNameToUnzip.toLowerCase();
                }

                File targetFile = new File(targetDir, fileNameToUnzip);

                if (zentry.isDirectory()) {// Directory 인 경우
                    FileUtils.makeDir(targetFile.getAbsolutePath()); // 디렉토리 생성
                } else { // File 인 경우
                    // parent Directory 생성
                    FileUtils.makeDir(targetFile.getParent());
                    unzipEntry(zis, targetFile);
                }
            }
        } finally {
            if (zis != null) {
                zis.close();
            }
            if (fis != null) {
                fis.close();
            }
        }
    }

    /**
     * Zip 파일의 한 개 엔트리의 압축을 푼다.
     *
     * @param zis - Zip Input Stream
     * @param filePath - 압축 풀린 파일의 경로
     * @return
     * @throws Exception
     */
    protected static File unzipEntry(ZipInputStream zis, File targetFile) throws Exception {
        FileOutputStream fos = null;
        try {
            fos = new FileOutputStream(targetFile);

            byte[] buffer = new byte[BUFFER_SIZE];
            int len = 0;
            while ((len = zis.read(buffer)) != -1) {
                fos.write(buffer, 0, len);
            }
        } finally {
            if (fos != null) {
                fos.close();
            }
        }
        return targetFile;
    }
}

위의 소스는 문제점이 있다.
사실 소스문제라기 보다는 java.util.zip 문제이다.
zip 파일안의 파일명의 인코딩을 UTF-8 로 하기 때문에 압축 대상 파일명에 한글이 있을경우 문제가 생긴다.
만약 압축 대상 파일명에 한글이 포함되어 있다면 jazzlib 를 사용하기 바란다.

jazzlib 는 java.util.zip 과 구조 및 사용법이 똑같으므로 위의 소스에서 ZipEntry, ZipOutputStream 의 import 문만 변경하여 주면 된다.

import net.sf.jazzlib.ZipEntry;
import net.sf.jazzlib.ZipInputStream;
2010. 3. 16. 11:17

안드로이드 AVD SDcard Mount 방법


개발을 위해서 Application 을 다운 받아서 설치하려고 했더니..

이게 왠일.. SDcard가 없다고 설치가 안된다고 나오더군요.


여기 저기 뒤져본 결과...


SDcard 이미지를 만들어서 환경설정에서 AVD 구동시 연결이 되게 하는 방법이 있더군요.


일단 SDcard 파일을 만들어야 합니다.

만드는 방법은...

Android SDK 를 설치를 했다면 SDK설치폴더\tools\ 에 보시면 mksdcard.exe 가 있습니다.


명령프롬프트로 해당 경로로 가셔서 아래와 같이 실행을 합니다.


mksdcard.exe -l sdcard 128M sdcard.iso


실행을 한 후 해당 폴더에 sdcard.iso 파일이 생성되어 있을 겁니다.


이제 이 SDcard 파일을 AVD와 연결하는게 남았습니다.


이클립스 메뉴에서 [Run] - [Run Configuration...] 아래와 같이 선택합니다.


위와 같이 메뉴를 클릭하면 아래와 같이 설정창이 뜹니다.

Additional Emulator Command Line Options

-sdcard SDcard파일 경로 를 입력합니다.


여기까지 하고 Run 하시면 SDcard가 있다고 나옵니다.


끝~


2010. 3. 8. 20:23

<jsp:include page=...>과 <@include file=...>의 차이


jsp:include page 는 자주 사용하지 않았습니다.
그냥 asp 때의 습관대로 <%@ include 를 많이 사용했죠.
<%@ include file 을 사용했을 때는 번번이 include 되는 파일이 변경된 때마다 서버의 캐시를 지웠다가 다시 로딩하고 해야했는데...즉 상위파일을 touch(변경) 시켜서 강제로 컴파일이 다시되게 해야함
<jsp:include page 는 매번 다시 컴파일 되어집니다.

<%@ include file="파일의 위치(url)" %>는 jsp 파일이 자바파일로 바꿀때
자바문서에 삽입되어 컴파일 되는것이고
<jsp:include page=파일 />은 자바로 바뀌고 컴파일이후 실행중에 값이 들어간다
이 정도 입니다


include file 은 상위파일에서 쓰던 변수를 그대로 사용할 수 있고
include page 는
<jsp:include page="a.jsp" flush="true">
<jsp:param name="abc" value="<%=abc%>"/>
</jsp:include>
이런식으로 useBean에서 파라미터 넘기는것 처럼.. 사용합니다..

해당 a.jsp 에서 받을때는 request.getParameter("abc")와 같이 받고요..

1. 정적인 include 지시문의 예 : <%@include file="/jsp/common/session.jsp"%>

정적이란 단어에 이미 모든 의미가 함축되어 있다. jsp 파일이 java 파일로 수정되기 전에 session.jsp 파일의 모든 내용이 부모의 jsp 로 include 된다. 그 후에 부모의 jsp 는  java -> class 파일-> html 문서 -> 웹 브라우저로 랜더링 된다. 따라서 session.jsp 파일 안에서 전역변수로 String greeting = "Hello Wordl"; 라고 정의했다면 session.jsp 를 사용하는 부모 jsp 에서는 서브릿 태그(<%%>) 에서 컴파일 에러 없이 바로 greeting 변수를 사용할 수 있다.


2. 동적인 include 지시문의 예 :

<jsp:include page="/jsp/common/uppermenu.jsp" flush="true">
</jsp:include>

동적이란 단어에 이미 모든 의미가 함축되어 있다. uppermenu.jsp 는 부모 jsp 가 java->class -> html 문서로 수정되어 실행되어질 시점에 삽입 된후 웹 브라우저로 랜더링 된다. 즉 정적 include  지시자 처럼 uppermenu.jsp 안에서 서브릿 태그를 선언하고 전역변수를 만든후에 부모 jsp 에서 그 변수를 사용할 수 없다. 동적 jsp 는 매번 컴파일되기 때문에 성능상의 문제를 야기시킬 수도 있으니 참고해서 사용하도록 한다.


                  <%--@include file="/subject/include/applicationTitle.jsp"--%>
                  <jsp:include page="/subject/include/applicationTitle.jsp" flush="true">
                    <jsp:param name="btnNO" value="0"/>
                    <jsp:param name="subjectSN" value="<%=subjectSN%>"/>
                    <jsp:param name="subjectStatusCD" value="<%=subjectStatusCD%>"/>
                  </jsp:include>

2010. 2. 20. 12:15

[내집마련] 3백으로, 월18만원 받는 오피스텔 잡다


나 역시 처음 경매를 접할 때 가진 돈이 그리 넉넉하지 않았다.

그러다 보니 자연스럽게 소액으로 할 수 있는 부동산을 찾게 되었고, 한 채 한 채 모으다 보니 자금력을 조금씩 갖추게 되었다.


내가 이런 방식으로 소액 투자를 성공했기 때문에 그 방법을 추천하는 것이다.

물론 우리나라에서 최고의 부동산 투자 가치가 있는 지역은 서울이다. 그렇지만 자금의 한계가 있고 특히 이제 부동산 재테크를 시작하는 이들에게는 그 벽이 훨씬 높게 느껴지는 것이 당연하다.


그렇다고 이대로 포기할 수는 없지 않은가?

자기 자금에 맞게 투자를 하려다 보니 수도권, 지방까지 물건을 보게 되는 것이다.


다만 수도권이나 지방의 물건을 공략하기 위해서는 개발 및 교통 호재나 공장의 이전, 산업단지, 물류단지 등 임대 수요를 풍부하게 할 수 있는 요인이 갖추어지거나 조만간 갖춰질 것이 예상되는 지역을 선점해야지 유찰이 많이 되었다는 이유만으로 접근하다가는 자칫 임대는 안되고, 투자금이 묶이는 경우가 발생할 수 있으므로 조심해야 한다.


물건을 검색하던 중 평택에 있는 오피스텔이 눈이 들어 왔다.


소유자 겸 채무자가 임대사업을 목적으로 40여 채를 운영했으나 무리하게 대출을 받는 바람에 결국 이자를 변제하지 못해 건물 전체가 경매로 나온 것으로 추정되었다.


오피스텔은 외부도 내부도 모두 깔끔했으며, 당장 낙찰을 받아 임대를 놓는다고 해도 손색이 없을 정도로 깨끗했다. 시세는 4천 5백만 원이었으며, 전세는 3천만 원 정도에 형성되어 있었다.


이 지역은 월세보다는 전세수요가 많았으며, 낙찰 받은 집 또한 임차인이 전세 3천만 원에 살고 있었다. 그런데 이 중 2천 5백만원까지는 배당을 받을 수 있으나 나머지 500만 원은 배당 받지 못하는 상황이었다.


우선 임차인을 만나보기로 하고 무작정 평택으로 향했다.

오피스텔 주변에는 낡은 빌라와 신축 빌라가 뒤섞여 있었으며, 실거주자 및 인근 근로자의 수요로 인해 임대 수요도 탄탄했다.


오피스텔 내부로 들어가 집 앞에 서서는 벨을 2-3번 눌렀다.

아무런 인기척이 없었다.


‘임차인을 만나고 가지 않으면 다음에 또 평택을 와야 한다. 오늘 꼭 만나고 가자.’

이렇게 속으로 결심하고 인근 공인중개사 사무소를 방문해 시세 및 각종 호재와 악재, 그리고 현재의 분위기 등을 듣고 2시간 정도 지난 후에 다시 돌아와 벨을 누르려고 하는 순간  안에서 사람이 나왔다.


“장00씨 맞나요?”

“네, 누구시죠?”

“이 집을 사려고 하는데, 제가 사면 여기 계속해서 사실 의향이 있으시나요?”

“이 집 경매로 나왔는데요.”

“네 알고 있습니다. 어떠세요?”

“저야 상황만 된다면 그대로 사는데 좋아요.”

“그럼 제가 처리하는데로 연락을 드릴게요. 이건 제 명함이구요. 선생님 연락처도 하나 알려주실래요?”


이렇게 해서 임차인의 거주 의사와 연락처를 알게 되었다.

그리고 입찰 당일. 내 눈에 좋아 보였으니 다른 사람 눈에도 좋아 보이겠지.

지금까지 임장했던 모든 메모와 자료들을 다시 한번 검토한 후 입찰 최대가와 최저가를 산정했다.


그리고 법원에서 드디어 최종 입찰가를 산정해 입찰함에 입찰봉투를 넣었다.

입찰마감을 하고 정리를 한 다음 한 사건씩 최고가매수신고인을 가려냈다.


드디어 내가 입찰한 물건의 결과가 나왔다.

총 4명이 입찰한 끝에 2천6백여만 원에 낙찰을 받았다. 휴~ 다행이다. 안도의 한숨을 쉬고

영수증을 받은 후 곧장 임차인에게 전화를 걸었다. 그리고 1시간 후에 집에서 만나기로 약속했다.


임차인은 거실로 나를 안내했고, 앉자마자 바로 용건을 이야기 했다.


“우선 장00씨께서 배당요구를 하셨는데 법원을 통해 전액 배당을 못 받아가는 건 아시죠?”

“그래요? 얼마정도 못 받는데요?”

“5백여만원 정도 못받을 것 같아요.”

“그럼 그건 어떻게 해야해요?”

“전 소유자에게 청구해야 하는데, 쉽지는 않겠지만 그 방법은 나중에 제가 알려 드리죠. 우선 계약을 어떻게 하실건지?”

“3천만원은 제가 가지고 있는 전부인데...제가 2천 5백만원정도 밖에 못받으면....어떻게 안될까요?”


“그럼 이렇게 하죠. 현재 전세가 3천 3백만원 정도인거 아시죠? 제가 대출을 1천 5백만원 정도 받을 계획입니다. 저랑은 보증금 1천만원에 월 15만에 계약을 하시죠. 그럼 전세가로 환산하면 2천 5백만원 밖에 되지 않습니다.”

“그렇게 하면 제 보증금이 문제되지 않나요?”

“그렇지 않습니다. 물론 그럴 일은 없지만 만약 이 집이 또 경매로 넘어가더라도 1천만원은 제일 먼저 보호를 받습니다. 제 말을 못 믿겠으면 주위에 아시는 법무사나 변호사에게 물어보세요.”


“그리고 어차피 배당금을 통해서 2천 5백만원을 모두 받으시니 1년치 월세를 한꺼번에 주시면 제가 20만원 깍아서 160만원에 해 드릴게요.”


지방에 있는 오피스텔이라 월세가 미납되면 번거롭고, 월세에 대해서도 신경을 쓰지 않아도 되기 때문에 나는 이런식의 계약을 자주 한다.


며칠 후 임차인과 1천만원에 월 15만원(깔세 형식으로 한번에 160만원을 모두 받기로 함)받기로 하고 계약을 했다.

  재계약을 했으니 도배 및 장판 교체비와 명도비는 굳은 것이다.


세금 및 부대비용을 합쳐 총 2천 8백여만 원이 들어갔는데, 대출과 임차보증금을 합친 2천 5백만을 제외하면 실질적으로 투자한 금액은 3백만 원에 불과했다. 게다가 대출 이자를 제외한 8만원이 매월 통장으로 들어오는 것과 같기 때문에 성공한 케이스라고 생각한다.


참고로 이 오피스텔은 현재 5천만 원에 거래되고 있으면 월 18만원씩 받고 있다. 결국 3백만 원 투자해 3여 년 동안을 평균 월 10여만 원을 받고 있으며 이를 매각하면 2천만 원이라는 거금을 쥐게 된다.


티끌모아 태산. 적은 돈으로도 충분히 부동산 재테크를 할 수 있다.

단지 그 방법을 모르고, 설령 방법을 안다고 하더라도 용기가 없기 때문에 실천을 못하는 것이다.

이제부터 시작하면 된다. 작은 것부터 하나씩 하나씩...

고수이름 | 북극성주

홈페이지| http://cafe.daum.net/PolarisAuction

소  개 | '친절한 경매'저자, 각종 신문 및 방송의 자문위원&패널로 활동

2010. 2. 19. 10:24

제공사(사이트)별 오픈 API 정리!!


요즘 개발자들은 참 행복합니다. 많은 사이트에서 오픈 API를 제공하여 프로그램개발이 훨씬 용이해졌기 때문이죠..
하지만 유행처럼 번진 오픈 API 제공. 수많은 API가 있긴한데… 어디서 누가 제공하는지 모르겠다는 ㅠ.ㅠ

그래서 한번 정리해봅니다.

제공사 API 분류 제공 API
네이버 검색 웹문서 검색, 블로그 검색, 카페 검색, 카페글 검색, 뉴스 검색
지식 iN 검색, 동영상 검색, 이미지 검색, 전문자료 검색, 실시간 급상슴 검색어
다음 지식 검색, 게시판 검색, 카페 검색, 블로그 검색, 동영상 검색, 이미지 검색
네이버 지도 JavaScript 지도, 플래쉬 지도 (※ 좌표 -> 주소 변환 API 제공)
다음 JavaScript 지도 (※ 좌표 <-> 주소 변환 API 제공)
야후 JavaScript 지도, 교통 API, 업체 정보, POI 검색 (※ 좌표 <-> 주소 변환 API 제공)
네이버 사전 백과사전
다음 국어 사전, 영어 사전, 한자 사전, 일본어 사전
네이버 컨텐츠 영화 정보, 영화인 정보, 책 정보, 지역 정보, 자동차 정보
다음 축제 정보, 영화 정보, 책 정보
옥션 쇼핑 옥션 인증, 상품 구매, 에스크로, 상품 판매, 상품 검색
지마켓 RSS형 상품 검색 API
네이버 쇼핑 검색
다음 쇼핑 검색, 상품 상세 정보


출처 : http://www.blueiblog.com/ko/archives/1244
2010. 2. 10. 18:32

안드로이드 에뮬레이터 host 수정법


host 파일 수정 방법

remount 한다.
>adb remount

안드로이드에 있는 host 파일을 받는다.
>adb pull /system/etc/hosts D:\TDPlatform\android_home\backup\

hosts 파일 수정한다.
---------------------------------------
기본적으로 로컬만 등록되어 있음.
127.0.0.1      localhost
---------------------------------------

host 파일을 넣는다.
>adb push D:\TDPlatform\android_home\work\hosts /system/etc/

hosts 파일 수정 확인해보기
>adb -e shell
#cat /system/etc/hosts