'안드로이드'에 해당되는 글 22건
- 2010.12.28 안드로이드 Intent에서 앱 호출하는 방법을 정리 16
- 2010.10.22 manifest-element 15
- 2010.04.13 Android의 9 patch(나인패치) drawable 이란?
- 2010.02.02 How to make a simple Android widget 5
- 2010.01.28 Using Google Maps in Android 63
- 2010.01.22 A Visual Guide to Android GUI Widgets
- 2010.01.21 안드로이드 에뮬레이터에 가상의 SD카드 마운트시키기
- 2010.01.20 Web View 샘플구현 8
- 2010.01.18 [Source] SD 카드에 저장되어 있는 비디오 목록 출력및 비디오 실행하기 11
- 2010.01.18 안드로이드 암시적 인텐트(Implicit Intent)를 사용해보자!
안드로이드 Intent에서 앱 호출하는 방법을 정리
연락처 Intent
- 연락처 조회
intent = new Intent(Intent.ACTION_VIEW,

    Uri.parse("content://contacts/people/" +

              String.valueOf(contact.getId())));

startActivity(intent);
- 연락처 등록
intent = new Intent(Intent.ACTION_INSERT,

    Uri.parse("content://contacts/people"));

startActivity(intent);
- 연락처 수정
intent = new Intent(Intent.ACTION_EDIT,

  Uri.parse("content://contacts/people/" +

            String.valueOf(contact.getId())));

startActivity(intent);
- 연락처 삭제
intent = new Intent(Intent.ACTION_DELETE,

    Uri.parse("content://contacts/people/" +

              String.valueOf(contact.getId())));

startActivity(intent);
전화 Intent
- 권한 설정 (AndroidManifest.xml)
전화 걸기         : CALL_PHONE = "android.permission.CALL_PHONE"

긴급 통화         : CALL_PRIVILEGED =

                     "android.permission.CALL_PRIVILEGED"

폰 상태 읽기      : READ_PHONE_STATE =

                    "android.permission.READ_PHONE_STATE"

폰 상태 수정      : MODIFY_PHONE_STATE =

                    "android.permission.MODIFY_PHONE_STATE"

브로드케스팅 수신 : PROCESS_OUTGOING_CALLS =

                    "android.permission.PROCESS_OUTGOING_CALLS"

전화 걸기 이전    : ACTION_NEW_OUTGOING_CALL =

                    "android.intent.action.NEW_OUTGOING_CALL"
- 전화걸기 화면
Intent intent = new Intent(Intent.ACTION_DIAL,

      Uri.parse("tel:" + TelNumber));

startActivity(intent);
- 전화걸기
Intent intent = new Intent(Intent.ACTION_CALL,

       Uri.parse("tel:" + TelNumber));

startActivity(intent);
SMS Intent
- 권한 설정 (AndroidManifest.xml)
수신 모니터링       : RECEIVE_SMS = "android.permission.RECEIVE_SMS"

읽기 가능           : READ_SMS = "android.permission.READ_SMS"

발송 가능           : SEND_SMS = "android.permission.SEND_SMS"

SMS Provider로 전송 : WRITE_SMS = "android.permission.WRITE_SMS"

                    : BROADCAST_SMS = "android.permission.BROADCAST_SMS"
- SMS 발송 화면
Intent intent = new Intent(Intent.ACTION_VIEW);

intent.putExtra("sms_body", "The SMS text");

intent.setType("vnd.android-dir/mms-sms");

startActivity(intent);
- SMS 보내기
Intent intent = new Intent(Intent.ACTION_SENDTO,

       Uri.parse("smsto://" + contact.getHandphone()));

intent.putExtra("sms_body", "The SMS text");

intent.setType("vnd.android-dir/mms-sms");

startActivity(intent);
이메일 Intent
- 이메일 발송 화면
Intent intent = new Intent(Intent.ACTION_SENDTO,

       Uri.parse("mailto:" + contact.getEmail()));

startActivity(intent);
브라우저 Intent
- Browser에서 URL 호출하기
new Intent(Intent.ACTION_VIEW, Uri.parse("http://www.google.com/"));

startActivity(intent);
- 브라우저에서 검색
Intent intent = new Intent(Intent.ACT ION_WEB_SEARCH);

intent.putExtra(SearchManager.QUERY, "검색어");

startActivity(intent);
지도 Intent
- 지도 보기
Uri uri = Uri.parse ("geo: 38.00, -35.03");

Intent intent = new Intent(Intent.ACTION_VIEW, uri);

startActivity(intent);
안드로이드 마켓 Intent
- 안드로이드 마켓에서 Apps 검색
Uri uri = Uri.parse("market://search?q=pname:전제_패키지_명");

//--- 예) market://search?q=pname:com.jopenbusiness.android.smartsearch

Intent intent = new Intent(Intent.ACTION_VIEW, uri);

startActivity(intent);
- 안드로이드 마켓의 App 상세 화면
Uri uri = Uri.parse("market://details?id=전제_패키지_명");

//--- 예) market://details?id=com.jopenbusiness.android.smartsearch

Intent intent = new Intent(Intent.ACTION_VIEW, uri);

startActivity(intent);
갤럭시S의 Intent
- 패키지명과 클래스명으로 App 호출
intent = new Intent(Intent.ACTION_MAIN);

intent.setComponent(new ComponentName("패키지명", "전체_클래스명"));

startActivity(intent);
- 전화, SMS
-
- 전화번호부 : com.android.contacts, com.sec.android.app.contacts.PhoneBookTopMenuActivity
- 전화 : com.sec.android.app.dialertab, com.sec.android.app.dialertab.DialerTabActivity
- 최근기록 : com.sec.android.app.dialertab, com.sec.android.app.dialertab.DialerTabDialerActivity
- 메시지 : com.sec.mms, com.sec.mms.Mms
- 이메일 : com.android.email, com.android.email.activity.Welcome
- 일정 : com.android.calendar, com.android.calendar.LaunchActivity
- 인터넷 : com.android.browser, com.android.browser.BrowserActivity
- Google의 Android용 앱
-
- 검색 : com.google.android.googlequicksearchbox, com.google.android.googlequicksearchbox.SearchActivity
- 음성 검색 : com.google.android.voicesearch, com.google.android.voicesearch.RecognitionActivity
- Gmail : com.google.android.gm, com.google.android.gm.ConversationListActivityGmail
- 지도 : com.google.android.apps.maps, com.google.android.maps.MapsActivity
- 위치찾기 : com.google.android.apps.maps, com.google.android.maps.LatitudeActivity
- YouTube : com.google.android.youtube, com.google.android.youtube.HomeActivity
- 토크 : com.google.android.talk, com.google.android.talk.SigningInActivity
- Goggles : com.google.android.apps.unveil, com.google.android.apps.unveil.CaptureActivity
- Google 번역 : com.google.android.apps.translate, com.google.android.apps.translate.HomeActivity
- Reader : com.google.android.apps.reader, com.google.android.apps.unveil.CaptureActivity
- Voice : com.google.android.apps.googlevoice, com.google.android.apps.googlevoice.SplashActivity
- Google 별지도 : com.google.android.stardroid, com.google.android.stardroid.activities.SplashScreenActivity
- 카메라 : com.sec.android.app.camera, com.sec.android.app.camera.Camera
- TV : com.sec.android.app.dmb, com.sec.android.app.dmb.activity.DMBFullScreenView
- Android 관리
-
- 환경 설정 : com.android.settings, com.android.settings.Settings
- 작업 관리자 : com.sec.android.app.controlpanel, com.sec.android.app.controlpanel.activity.JobManagerActivity
- 마켓 : com.android.vending, com.android.vending.AssetBrowserActivity
출처 : http://www.jopenbusiness.com/tc/oss/entry/Android-Intent-%ED%99%9C%EC%9A%A9-%EC%82%AC%EB%A1%80
<manifest>
- syntax:
<manifest xmlns:android="http://schemas.android.com/apk/res/android"

          package="string"

          android:sharedUserId="string"

          android:sharedUserLabel="string resource"

          android:versionCode="integer"

          android:versionName="string"

          android:installLocation=["auto" | "internalOnly" | "preferExternal"] >

    . . .

</manifest>- contained in:
- none
- must contain:
<application>- can contain:
<instrumentation>
<permission>
<permission-group>
<permission-tree>
<uses-configuration>
<uses-permission>- description:
- The root element of the AndroidManifest.xml file. It must contain an
<application>element and specifyxlmns:androidandpackageattributes. - attributes:
-
xmlns:android- Defines the Android namespace. This attribute should always be set to "
http://schemas.android.com/apk/res/android". package- A full Java package name for the application. The name should be unique. The name may contain uppercase or lowercase letters ('A' through 'Z'), numbers, and underscores ('_'). However, individual package name parts may only start with letters. For example, applications published by Google could have names in the form
com.google.app.application_name.The package name serves as a unique identifier for the application. It's also the default name for the application process (see the
<application>element'sprocessprocess attribute) and the default task affinity of an activity (see the<activity>element'staskAffinityattribute). android:sharedUserId- The name of a Linux user ID that will be shared with other applications. By default, Android assigns each application its own unique user ID. However, if this attribute is set to the same value for two or more applications, they will all share the same ID — provided that they are also signed by the same certificate. Application with the same user ID can access each other's data and, if desired, run in the same process.
android:sharedUserLabel- A user-readable label for the shared user ID. The label must be set as a reference to a string resource; it cannot be a raw string.
This attribute was introduced in API Level 3. It is meaningful only if the
sharedUserIdattribute is also set. android:versionCode- An internal version number. This number is used only to determine whether one version is more recent than another, with higher numbers indicating more recent versions. This is not the version number shown to users; that number is set by the
versionNameattribute.The value must be set as an integer, such as "100". You can define it however you want, as long as each successive version has a higher number. For example, it could be a build number. Or you could translate a version number in "x.y" format to an integer by encoding the "x" and "y" separately in the lower and upper 16 bits. Or you could simply increase the number by one each time a new version is released.
android:versionName- The version number shown to users. This attribute can be set as a raw string or as a reference to a string resource. The string has no other purpose than to be displayed to users. The
versionCodeattribute holds the significant version number used internally. android:installLocation- The default install location for the application.
The following keyword strings are accepted:
Value Description " internalOnly"The application must be installed on the internal device storage only. If this is set, the application will never be installed on the external storage. If the internal storage is full, then the system will not install the application. This is also the default behavior if you do not define android:installLocation." auto"The application may be installed on the external storage, but the system will install the application on the internal storage by default. If the internal storage is full, then the system will install it on the external storage. Once installed, the user can move the application to either internal or external storage through the system settings. " preferExternal"The application prefers to be installed on the external storage (SD card). There is no guarantee that the system will honor this request. The application might be installed on internal storage if the external media is unavailable or full, or if the application uses the forward-locking mechanism (not supported on external storage). Once installed, the user can move the application to either internal or external storage through the system settings. Note: By default, your application will be installed on the internal storage and cannot be installed on the external storage unless you define this attribute to be either "
auto" or "preferExternal".When an application is installed on the external storage:
- The
.apkfile is saved to the external storage, but any application data (such as databases) is still saved on the internal device memory. - The container in which the
.apkfile is saved is encrypted with a key that allows the application to operate only on the device that installed it. (A user cannot transfer the SD card to another device and use applications installed on the card.) Though, multiple SD cards can be used with the same device. - At the user's request, the application can be moved to the internal storage.
The user may also request to move an application from the internal storage to the external storage. However, the system will not allow the user to move the application to external storage if this attribute is set to
internalOnly, which is the default setting.Introduced in: API Level 8.
- The
- introduced in:
- API Level 1 for all attributes, unless noted otherwise in the attribute description.
- see also:
- App Install Location
<application>
<uses-sdk>
Android의 9 patch(나인패치) drawable 이란?
일반 PNG 이미지에서 1pixel의 보더를 가지는 형태로 구성되어있습니다. 이 보더가 늘어나는 영역과 늘어나지 않는 영역을 정의하게 됩니다. 왼쪽과 위쪽의 1 pixel 검은색 선은 늘어날 수 있는 부분을 정의합니다. 늘어날 수 있는 부분은 여러개가 될 수 있습니다.
오른쪽과 아래쪽의 1 pixel 검은색 선은 뷰가 그려질 영역을 정하는 일을 합니다. 다시 말해 패딩 영역을 결정합니다. 만약 이 선을 그리지 않는다면 왼쪽과 위쪽의 선이 사용됩니다. 예를 들어 텍스트뷰의 경우 그려질 텍스트가 이 선이 그려진 영역안에서 표시됩니다.
나인패치 이미지를 쉽게 만들기 위해서 SDK의 Tools디렉토리에 draw9patch라고 하는 이미지 에디터가 들어있습니다. 아니면 그냥 일반적인 그래픽 에디터에서 그려도 상관없습니다.

파일이름은 반드시 .9.png라고 끝나도록 저장해주어야 합니다. res/drawable/some_name.9.png 와 같은 형태가 되겠지요. 만약 그냥 png라고 끝난다면 일반 이미지 파일로 처리가 됩니다.
예제를 한번 확인해보시지요. 왼쪽의 버튼과 오른쪽의 버튼은 모두 같은 나인패치 Drawable을 백그라운드 이미지로 사용하고 있습니다. 이미지 파일 하나로 다양한 크기의 버튼의 백그라운드로 사용될 수 있다는 것은 정말 편리하고 UI작업을 할 때 항상 사용하는 것이니 알아두시면 좋습니다.
http://www.androidpub.com/2096
How to make a simple Android widget
Yesterday I made my first Android widget. A very simple widget, just to try it out. It can show the time. No more, no less. I will here show you how to get started on widgets. I’ll start from scratch, so you actually don’t need any knowledge on Android development. Well, of course you need to have the SDK, and Eclipse installed and ready.
I used the 1.5 SDK, but it will probably work on newer SDK’s too.
I will show you how to do it in 6 easy steps.
1. Create a new Android project
Fire up Eclipse, and click File -> New -> Android project

Type in a name for you project, eg. WatchWidget. Select the target, 1.5 in my case. I guess that there could be differences, so if you are not experienced in Android development, I suggest that you use 1.5 too.
Then we need an application name, which is the name that will show up on your phone. And last but not least, a package name.
Uncheck “Create activity”, as we don’t want any activities in this sample.
Click Finish to create the project. Now you have a structure that looks like this:

2. Create the Java class
Right-click com.kasperholtze.watchwidget (or whatever you used for package name), and select New -> Class:

Give the class a name, i.e. WatchWidget. Then we need to extend the AppWidgetProvider, so type in android.appwidget.AppWidgetProvider as superclass, or browse for it.
Click Finish, and Eclipse will generate the following code:
import android.appwidget.AppWidgetProvider;
public class WatchWidget extends AppWidgetProvider {
}
3. Create the Java code
Now it’s time to create our Java code, for updating the widget. Type in the following code:
import java.text.DateFormat;
import java.text.SimpleDateFormat;
import java.util.Date;
import java.util.Locale;
import com.kasperholtze.watchwidget.R;
import android.appwidget.AppWidgetManager;
import android.appwidget.AppWidgetProvider;
import android.content.ComponentName;
import android.content.Context;
import android.widget.RemoteViews;
public class WatchWidget extends AppWidgetProvider
{
@Override
public void onUpdate( Context context, AppWidgetManager appWidgetManager, int[] appWidgetIds )
{
RemoteViews remoteViews;
ComponentName watchWidget;
DateFormat format = SimpleDateFormat.getTimeInstance( SimpleDateFormat.MEDIUM, Locale.getDefault() );
remoteViews = new RemoteViews( context.getPackageName(), R.layout.main );
watchWidget = new ComponentName( context, WatchWidget.class );
remoteViews.setTextViewText( R.id.widget_textview, "Time = " + format.format( new Date()));
appWidgetManager.updateAppWidget( watchWidget, remoteViews );
}
}
The only method we use in this class, is onUpdate( Context context, AppWidgetManager appWidgetManager, int[] appWidgetIds ), which we override from the AppWidgetProvider class.
First we create three objects. remoteViews, watchWidget and format. remoteViews is a reference to the main view, which we will create in a moment. watchWidget is a reference to our class, and format is the date format used to show the time.
Then we initialize the remoteViews and watchWidget. You will get an error one the line remoteViews.setTextViewText(), which is where we actually update the text on our widget, stating that R.id is not found, but that’s all right for now. We will create that one in a moment too.
appWidgetManager.updateAppWidget sets the RemoteViews that should be used for our widget.
4. Edit the view for our widget, main.xml
Using the UI designer takes some trying, testing and failing. If you have not tried this yet, you should try playing around with it. It takes some time to get the feeling of it.
My main.xml looks like this:
<LinearLayout
xmlns:android="http://schemas.android.com/apk/res/android"
android:id="@+id/LinearLayout01"
android:layout_height="200dp"
android:background="@drawable/background"
android:layout_width="160dp"
android:orientation="horizontal">
<TextView
android:id="@+id/widget_textview"
android:layout_width="fill_parent"
android:layout_height="fill_parent"
android:gravity="center_vertical|center_horizontal"
android:textColor="@android:color/black"
android:text="17:12:34 PM"
android:textSize="8pt"
/>
</LinearLayout>
It contains a LinearLayout with a TextView inside. The important thing is the id of out TextView, which we used earlier in the WatchWidget class.
I used a standard widget background, which you can download at http://developer.android.com/guide/practices/ui_guidelines/widget_design.html. You can also grab it here:

Save it in the project, at res/drawable/background.png
5. Edit AndroidManifest.xml
The next thing is to edit the AndroidManifest.xml, which defines the application. We need to add an intent-filter, meta-data that defines which xml file we use for defining the widget provider, and name and other details of the application.
Here it goes…
<manifest
xmlns:android="http://schemas.android.com/apk/res/android"
package="com.kasperholtze.watchwidget"
android:versionCode="1"
android:versionName="1.0">
<application android:icon="@drawable/icon" android:label="@string/app_name" android:debuggable="true">
<receiver android:name=".WatchWidget" android:label="@string/app_name">
<intent-filter>
<action android:name="android.appwidget.action.APPWIDGET_UPDATE" />
</intent-filter>
<meta-data
android:name="android.appwidget.provider"
android:resource="@xml/watch_widget_provider" />
</receiver>
</application>
<uses-sdk android:minSdkVersion="3" />
</manifest>
6. Create widget provider
The last thing we have to do, before the application is ready to run, is to create a XML file, defining the widget provider. Create a new folder under res, called xml, and save the file as res/xml/watch_widget_provider.xml.
<appwidget-provider
xmlns:android="http://schemas.android.com/apk/res/android"
android:minWidth="146dp"
android:initialLayout="@layout/main"
android:updatePeriodMillis="1000"
android:minHeight="144dp"/>
Here we set the minimum size that the widget needs to be added to a home screen. And then we set the updatePeriodMillis. updatePeriodMillis defines how often we wish to call the onUpdate method that we created earlier in the Java class.
That’s it! Connect your phone, or fire up a virtual device, and try it out
Creating the Project
Using Eclipse, create a new Android project and name GoogleMaps as shown in Figure 1.
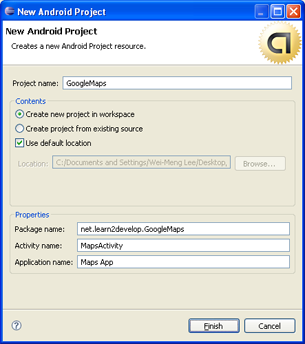
Figure 1 Creating a new Android project using Eclipse
Obtaining a Maps API key
Beginning with the Android SDK release v1.0, you need to apply for a free Google Maps API key before you can integrate Google Maps into your Android application. To apply for a key, you need to follow the series of steps outlined below. You can also refer to Google's detailed documentation on the process at http://code.google.com/android/toolbox/apis/mapkey.html.
First, if you are testing the application on the Android emulator, locate the SDK debug certificate located in the default folder of "C:\Documents and Settings\<username>\Local Settings\Application Data\Android". The filename of the debug keystore is debug.keystore. For deploying to a real Android device, substitute the debug.keystore file with your own keystore file. In a future article I will discuss how you can generate your own keystore file.
For simplicity, copy this file (debug.keystore) to a folder in C:\ (for example, create a folder called "C:\Android").
Using the debug keystore, you need to extract its MD5 fingerprint using the Keytool.exe application included with your JDK installation. This fingerprint is needed to apply for the free Google Maps key. You can usually find the Keytool.exe from the "C:\Program Files\Java\<JDK_version_number>\bin" folder.
Issue the following command (see also Figure 2) to extract the MD5 fingerprint.
keytool.exe -list -alias androiddebugkey -keystore "C:\android\debug.keystore" -storepass
android -keypass android
Copy the MD5 certificate fingerprint and navigate your web browser to: http://code.google.com/android/maps-api-signup.html. Follow the instructions on the page to complete the application and obtain the Google Maps key.
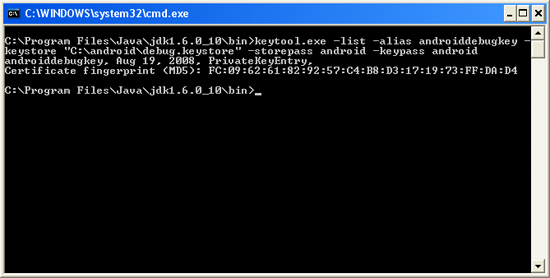
Figure 2 Obtaining the MD5 fingerprint of the debug keystore
To use the Google Maps in your Android application, you need to modify your AndroidManifest.xml file by adding the <uses-library> element together with the INTERNET permission:
<?xml version="1.0" encoding="utf-8"?>
<manifest xmlns:android="http://schemas.android.com/apk/res/android"
      package="net.learn2develop.GoogleMaps"
      android:versionCode="1"
      android:versionName="1.0.0">
    <application android:icon="@drawable/icon" android:label="@string/app_name">

    <uses-library android:name="com.google.android.maps" />

        <activity android:name=".MapsActivity"
                  android:label="@string/app_name">
            <intent-filter>
                <action android:name="android.intent.action.MAIN" />
                <category android:name="android.intent.category.LAUNCHER" />
            </intent-filter>
        </activity>
    </application>

    <uses-permission android:name="android.permission.INTERNET" />

</manifest>
</xml>
Displaying the Map
To display the Google Maps in your Android application, modify the main.xml file located in the res/layout folder. You shall use the <com.google.android.maps.MapView> element to display the Google Maps in your activity. In addition, let's use the <RelativeLayout> element to position the map within the activity:
<?xml version="1.0" encoding="utf-8"?>
<RelativeLayout xmlns:android="http://schemas.android.com/apk/res/android"
    android:layout_width="fill_parent"
    android:layout_height="fill_parent">

    <com.google.android.maps.MapView
        android:id="@+id/mapView"
        android:layout_width="fill_parent"
        android:layout_height="fill_parent"
        android:enabled="true"
        android:clickable="true"
        android:apiKey="0l4sCTTyRmXTNo7k8DREHvEaLar2UmHGwnhZVHQ"
        />

</RelativeLayout>
Notice from above that I have used the Google Maps key that I obtained earlier and put it into the apiKey attribute.
In the MapsActivity.java file, modify the class to extend from the MapActivity class, instead of the normal Activity class:
package net.learn2develop.GoogleMaps;

import com.google.android.maps.MapActivity;
import com.google.android.maps.MapView;
import android.os.Bundle;

public class MapsActivity extends MapActivity
{
    /** Called when the activity is first created. */
    @Override
    public void onCreate(Bundle savedInstanceState)
    {
        super.onCreate(savedInstanceState);
        setContentView(R.layout.main);
    }

    @Override
    protected boolean isRouteDisplayed() {
        return false;
    }
}
Observe that if your class extends the MapActivity class, you need to override the isRouteDisplayed() method. You can simply do so by setting the method to return false.
That's it! That's all you need to do to display the Google Maps in your application. Press F11 in Eclipse to deploy the application onto an Android emulator. Figure 3 shows the Google map in all its glory.
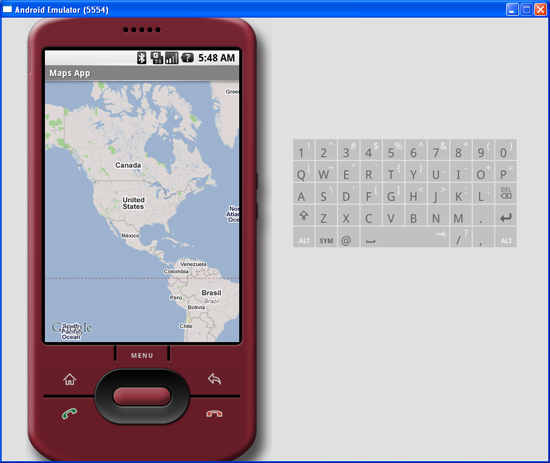
Figure 3 Google Maps in your application
At this juncture, take note of a few troubleshooting details. If your program does not run (i.e. it crashes), then it is likely you forgot to put the following statement in your AndroidManifest.xml file:
<uses-library android:name="com.google.android.maps" />If your application manages to load but you cannot see the map (all you see is a grid), then it is very likely you do not have a valid Map key, or that you did not specify the INTERNET permission:
<uses-permission android:name="android.permission.INTERNET" />Displaying the Zoom View
The previous section showed how you can display the Google Maps in your Android device. You can drag the map to any desired location and it will be updated on the fly. However, observe that there is no way to zoom in or out from a particular location. Thus, in this section, you will learn how you can let users zoom into or out of the map.
First, add a <LinearLayout> element to the main.xml file as shown below:
<?xml version="1.0" encoding="utf-8"?>
<RelativeLayout xmlns:android="http://schemas.android.com/apk/res/android"
    android:layout_width="fill_parent"
    android:layout_height="fill_parent">

    <com.google.android.maps.MapView
        android:id="@+id/mapView"
        android:layout_width="fill_parent"
        android:layout_height="fill_parent"
        android:enabled="true"
        android:clickable="true"
        android:apiKey="0l4sCTTyRmXTNo7k8DREHvEaLar2UmHGwnhZVHQ"
        />

    <LinearLayout android:id="@+id/zoom"
        android:layout_width="wrap_content"
        android:layout_height="wrap_content"
        android:layout_alignParentBottom="true"
        android:layout_centerHorizontal="true"
        />

</RelativeLayout>
You will use the <LinearLayout> element to hold the two zoom controls in Google Maps (you will see this shortly).
In the MapsActivity.java file, add the following imports:
import com.google.android.maps.MapView.LayoutParams;
import android.view.View;
import android.widget.LinearLayout;
and add the following code after the line setContentView(R.layout.main);
        mapView = (MapView) findViewById(R.id.mapView);
        LinearLayout zoomLayout = (LinearLayout)findViewById(R.id.zoom);
        View zoomView = mapView.getZoomControls();

        zoomLayout.addView(zoomView,
            new LinearLayout.LayoutParams(
                LayoutParams.WRAP_CONTENT,
                LayoutParams.WRAP_CONTENT));
        mapView.displayZoomControls(true);
The complete MapsActivity.java file is given below:
package net.learn2develop.GoogleMaps;

import com.google.android.maps.MapActivity;
import com.google.android.maps.MapView;
import com.google.android.maps.MapView.LayoutParams;

import android.os.Bundle;
import android.view.View;
import android.widget.LinearLayout;

public class MapsActivity extends MapActivity
{
    MapView mapView;

    /** Called when the activity is first created. */
    @Override
    public void onCreate(Bundle savedInstanceState)
    {
        super.onCreate(savedInstanceState);
        setContentView(R.layout.main);


        mapView = (MapView) findViewById(R.id.mapView);
        LinearLayout zoomLayout = (LinearLayout)findViewById(R.id.zoom);
        View zoomView = mapView.getZoomControls();

        zoomLayout.addView(zoomView,
            new LinearLayout.LayoutParams(
                LayoutParams.WRAP_CONTENT,
                LayoutParams.WRAP_CONTENT));
        mapView.displayZoomControls(true);

    }

    @Override
    protected boolean isRouteDisplayed() {
        // TODO Auto-generated method stub
        return false;
    }
}
Basically, you obtain the MapView instance on the activity, obtain its zoom controls and then add it to the LinearLayout element you added to the activity earlier on. In the above case, the zoom control will be displayed at the bottom of the screen. When you now press F11 in Eclipse, you will see the zoom controls when you touch the map (see Figure 4).
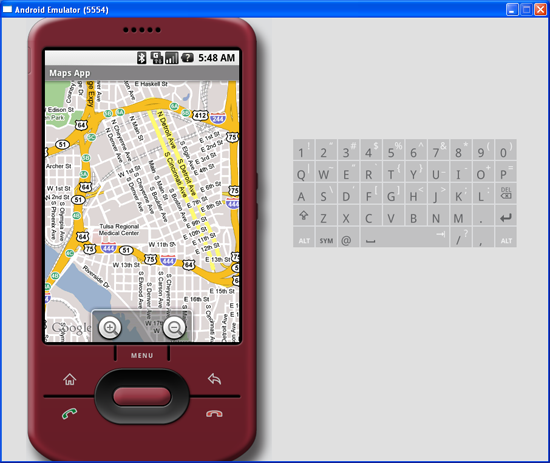
Figure 4 Using the zoom controls in Google Maps
Using the zoom control, you can zoom in or out of a location by simply touching the "+ or "-" buttons on the screen.
Alternatively, you can also programmatically zoom in or out of the map using the zoomIn() and zoomOut() methods from the MapController class:
package net.learn2develop.GoogleMaps;

//...
import android.os.Bundle;
import android.view.KeyEvent;

public class MapsActivity extends MapActivity
{
    MapView mapView;

    public boolean onKeyDown(int keyCode, KeyEvent event)
    {
        MapController mc = mapView.getController();
        switch (keyCode)
        {
            case KeyEvent.KEYCODE_3:
                mc.zoomIn();
                break;
            case KeyEvent.KEYCODE_1:
                mc.zoomOut();
                break;
        }
        return super.onKeyDown(keyCode, event);
    }

    /** Called when the activity is first created. */
    @Override
    public void onCreate(Bundle savedInstanceState)
    {
        //...
    }

    @Override
    protected boolean isRouteDisplayed() {
        // TODO Auto-generated method stub
        return false;
    }
}
In the above code, when the user presses the number 3 on the keyboard the map will zoom in into the next level. Pressing number 1 will zoom out one level.
Changing Views of the Map
By default, the Google Maps displays in the map mode. If you wish to display the map in satellite view, you can use the setSatellite() method of the MapView class, like this:
mapView.setSatellite(true);
You can also display the map in street view, using the setStreetView() method:
mapView.setStreetView(true);
Figure 5 shows the Google Maps displayed in satellite and street views, respectively.
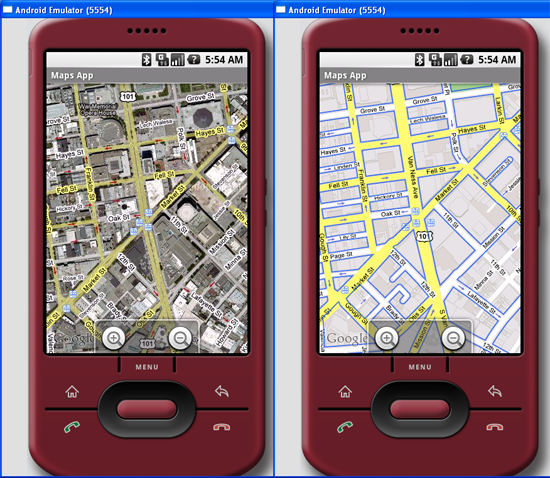
Figure 5 Displaying Google Maps in satellite and street views
Displaying a Particular Location
Be default, the Google Maps displays the map of the United States when it is first loaded. However, you can also set the Google Maps to display a particular location. In this case, you can use the animateTo() method of the MapController class.
The following code shows how this is done:
package net.learn2develop.GoogleMaps;

import com.google.android.maps.GeoPoint;
import com.google.android.maps.MapActivity;
import com.google.android.maps.MapController;
import com.google.android.maps.MapView;
import com.google.android.maps.MapView.LayoutParams;

import android.os.Bundle;
import android.view.View;
import android.widget.LinearLayout;

public class MapsActivity extends MapActivity
{
    MapView mapView;
    MapController mc;
    GeoPoint p;

    /** Called when the activity is first created. */
    @Override
    public void onCreate(Bundle savedInstanceState)
    {
        super.onCreate(savedInstanceState);
        setContentView(R.layout.main);

        mapView = (MapView) findViewById(R.id.mapView);
        LinearLayout zoomLayout = (LinearLayout)findViewById(R.id.zoom);
        View zoomView = mapView.getZoomControls();

        zoomLayout.addView(zoomView,
            new LinearLayout.LayoutParams(
                LayoutParams.WRAP_CONTENT,
                LayoutParams.WRAP_CONTENT));
        mapView.displayZoomControls(true);

        mc = mapView.getController();
        String coordinates[] = {"1.352566007", "103.78921587"};
        double lat = Double.parseDouble(coordinates[0]);
        double lng = Double.parseDouble(coordinates[1]);

        p = new GeoPoint(
            (int) (lat * 1E6),
            (int) (lng * 1E6));

        mc.animateTo(p);
        mc.setZoom(17);
        mapView.invalidate();
    }

    @Override
    protected boolean isRouteDisplayed() {
        // TODO Auto-generated method stub
        return false;
    }
}
In the above code, you first obtain a controller from the MapView instance and assign it to a MapController object (mc). You use a GeoPoint object to represent a geographical location. Note that for this class the latitude and longitude of a location are represented in micro degrees. This means that they are stored as integer values. For a latitude value of 40.747778, you need to multiply it by 1e6 to obtain 40747778.
To navigate the map to a particular location, you can use the animateTo() method of the MapController class (an instance which is obtained from the MapView object). The setZoom() method allows you to specify the zoom level in which the map is displayed. Figure 6 shows the Google Maps displaying the map of Singapore.
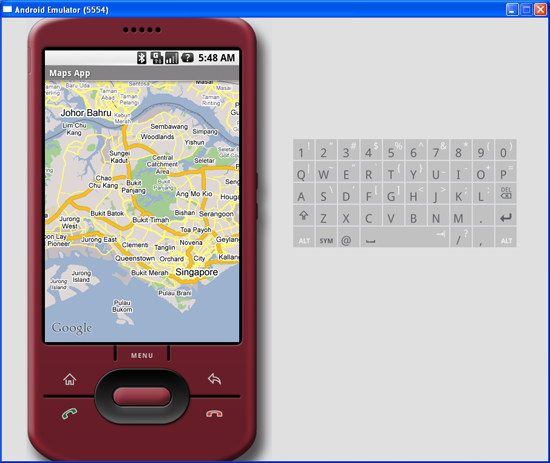
Figure 6 Navigating to a particular location on the map
Adding Markers
Very often, you may wish to add markers to the map to indicate places of interests. Let's see how you can do this in Android. First, create a GIF image containing a pushpin (see Figure 7) and copy it into the res/drawable folder of the project. For best effect, you should make the background of the image transparent so that it does not block off parts of the map when the image is added to the map.
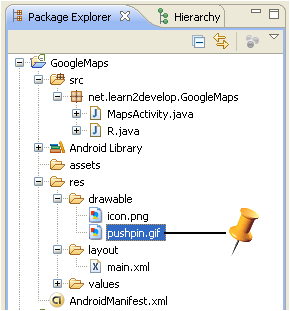
Figure 7 Adding an image to the res/drawable folder
To add a marker to the map, you first need to define a class that extends the Overlay class:
package net.learn2develop.GoogleMaps;

import java.util.List;

import com.google.android.maps.GeoPoint;
import com.google.android.maps.MapActivity;
import com.google.android.maps.MapController;
import com.google.android.maps.MapView;
import com.google.android.maps.Overlay;
import com.google.android.maps.MapView.LayoutParams;

import android.graphics.Bitmap;
import android.graphics.BitmapFactory;
import android.graphics.Canvas;
import android.graphics.Point;
import android.os.Bundle;
import android.view.View;
import android.widget.LinearLayout;

public class MapsActivity extends MapActivity
{
    MapView mapView;
    MapController mc;
    GeoPoint p;

    class MapOverlay extends com.google.android.maps.Overlay
    {
        @Override
        public boolean draw(Canvas canvas, MapView mapView,
        boolean shadow, long when)
        {
            super.draw(canvas, mapView, shadow);

            //---translate the GeoPoint to screen pixels---
            Point screenPts = new Point();
            mapView.getProjection().toPixels(p, screenPts);

            //---add the marker---
            Bitmap bmp = BitmapFactory.decodeResource(
                getResources(), R.drawable.pushpin);
            canvas.drawBitmap(bmp, screenPts.x, screenPts.y-50, null);
            return true;
        }
    }

    /** Called when the activity is first created. */
    @Override
    public void onCreate(Bundle savedInstanceState)
    {
        //...
    }

    @Override
    protected boolean isRouteDisplayed() {
        // TODO Auto-generated method stub
        return false;
    }
}
In the MapOverlay class that you have defined, override the draw() method so that you can draw the pushpin image on the map. In particular, note that you need to translate the geographical location (represented by a GeoPoint object, p) into screen coordinates.
As you want the pointed tip of the push pin to indicate the position of the location, you would need to deduct the height of the image (which is 50 pixels) from the y-coordinate of the point (see Figure 8) and draw the image at that location.
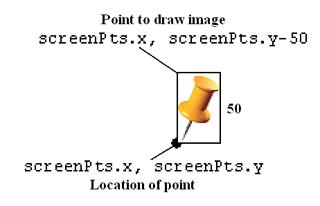
Figure 8 Adding an image to the map
To add the marker, create an instance of the MapOverlap class and add it to the list of overlays available on the MapView object:
    @Override
    public void onCreate(Bundle savedInstanceState)
    {
        super.onCreate(savedInstanceState);
        setContentView(R.layout.main);

        //...

        mc.animateTo(p);
        mc.setZoom(17);

        //---Add a location marker---
        MapOverlay mapOverlay = new MapOverlay();
        List<Overlay> listOfOverlays = mapView.getOverlays();
        listOfOverlays.clear();
        listOfOverlays.add(mapOverlay);

        mapView.invalidate();
    }
Figure 9 shows how the pushpin looks like when added to the map.
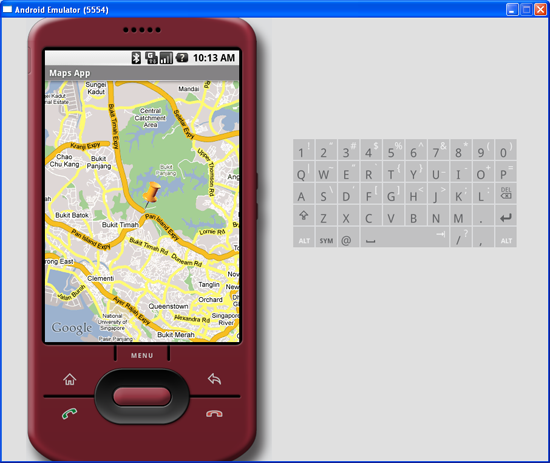
Figure 9 Adding a marker to the map
Getting the Location that was touched
After using Google Maps for a while, you may wish to know the latitude and longitude of a location corresponding to the position on the screen that you have just touched. Knowing this information is very useful as you can find out the address of a location, a process known as Geocoding (you will see how this is done in the next section).
If you have added an overlay to the map, you can override the onTouchEvent() method within the Overlay class. This method is fired every time the user touches the map. This method has two parameters - MotionEvent and MapView. Using the MotionEvent parameter, you can know if the user has lifted his finger from the screen using the getAction() method. In the following code, if the user has touched and then lifted his finger, you will display the latitude and longitude of the location touched:
    class MapOverlay extends com.google.android.maps.Overlay
    {
        @Override
        public boolean draw(Canvas canvas, MapView mapView,
        boolean shadow, long when)
        {
           //...
        }

        @Override
        public boolean onTouchEvent(MotionEvent event, MapView mapView)
        {
            //---when user lifts his finger---
            if (event.getAction() == 1) {
                GeoPoint p = mapView.getProjection().fromPixels(
                    (int) event.getX(),
                    (int) event.getY());
                    Toast.makeText(getBaseContext(),
                        p.getLatitudeE6() / 1E6 + "," +
                        p.getLongitudeE6() /1E6 ,
                        Toast.LENGTH_SHORT).show();
            }
            return false;
        }
    }
Figure 10 shows this in action.

Figure 10 Displaying the latitude and longitude of a point touched on the map
Geocoding and Reverse Geocoding
If you know the latitude and longitude of a location, you can find out its address using a process known as Geocoding. Google Maps in Android supports this via the Geocoder class. The following code shows how you can find out the address of a location you have just touched using the getFromLocation() method:
    class MapOverlay extends com.google.android.maps.Overlay
    {
        @Override
        public boolean draw(Canvas canvas, MapView mapView,
        boolean shadow, long when)
        {
          //...
        }

        @Override
        public boolean onTouchEvent(MotionEvent event, MapView mapView)
        {
            //---when user lifts his finger---
            if (event.getAction() == 1) {
                GeoPoint p = mapView.getProjection().fromPixels(
                    (int) event.getX(),
                    (int) event.getY());

                Geocoder geoCoder = new Geocoder(
                    getBaseContext(), Locale.getDefault());
                try {
                    List<Address> addresses = geoCoder.getFromLocation(
                        p.getLatitudeE6()  / 1E6,
                        p.getLongitudeE6() / 1E6, 1);

                    String add = "";
                    if (addresses.size() > 0)
                    {
                        for (int i=0; i<addresses.get(0).getMaxAddressLineIndex();
                             i++)
                           add += addresses.get(0).getAddressLine(i) + "\n";
                    }

                    Toast.makeText(getBaseContext(), add, Toast.LENGTH_SHORT).show();
                }
                catch (IOException e) {
                    e.printStackTrace();
                }
                return true;
            }
            else
                return false;
        }
    }
Figure 11 shows the above code in action.
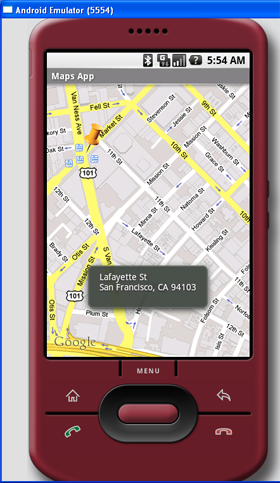
Figure 11 Performing Geocoding in Google Maps
If you know the address of a location but want to know its latitude and longitude, you can do so via reverse-Geocoding. Again, you can use the Geocoder class for this purpose. The following code shows how you can find the exact location of the Empire State Building by using the getFromLocationName() method:
        Geocoder geoCoder = new Geocoder(this, Locale.getDefault());
        try {
            List<Address> addresses = geoCoder.getFromLocationName(
                "empire state building", 5);
            String add = "";
            if (addresses.size() > 0) {
                p = new GeoPoint(
                        (int) (addresses.get(0).getLatitude() * 1E6),
                        (int) (addresses.get(0).getLongitude() * 1E6));
                mc.animateTo(p);
                mapView.invalidate();
            }
        } catch (IOException e) {
            e.printStackTrace();
        }
Once the location is found, the above code navigates the map to the location. Figure 12 shows the code in action.
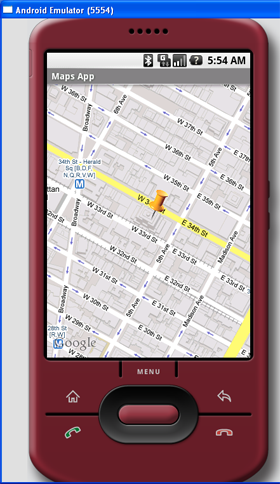
Figure 12 Navigating to the Empire State Building
Summary
In this article, you have learnt a few tricks for the Google Maps in Android. Using Google Maps, there are many interesting projects you can work on, such as geo-tagging, geo-tracking, etc. If you have cool ideas on building cool location-based services, share with us in the comments box below. Have fun!
A Visual Guide to Android GUI Widgets
For rapid development of your user interfaces try DroidDraw
에뮬레이터 실행 버튼 클릭
그러면 에뷸레이터가 실행된다.(꼭 실행해야 다음이 진행된다.)
이렇게 설정을 끝낸 후, 에뮬레이터를 실행시키면 가상 SD카드가 마운트 된 채로 에뮬레이터가 실행됩니다.
그럼, 이 SD카드에 파일을 넣어볼까요?
이클립스에서 DDMS를 실행시킨 후, File Explorer탭을 클릭해보면 아래와 같은 아이콘이 보이실겁니다. 에뮬레이터에 파일을 넣어야하니 Push a file onto the device를 눌러줍니다.


자, 저렇게 해주면 이렇게! 뿅! 들어가있는 것을 볼 수 있습니다.
자, 그럼 이제 이 파일을 안드로이드 에뮬레이터에서 들어볼까요?
파일을 추가했으니, 바로 음악을 듣기 전에 Dev Tools의 Media Scanner를 실행해서 파일을 인식시켜주어야 합니다.

Media Scanner가 새로 추가된 파일을 검색중인 화면.
검색이 끝났다면, 음악을 들어볼까요?
Music을 눌러보시면, 다음과 같이 음악이 추가되어있는 것을 보실 수 있을 겁니다!

음악 파일 뿐만 아니라 다른 파일을 넣을 떄에도 지금과 동일한 과정으로 수행하시면 됩니다. :)
p.s : 이걸 통해서 삭막한 개발환경을 조금이나마 업 시킬수 있겠네요~ :)
 WebViewingApp.zip
시나리오
아래와 같은 뷰를 작성합니다.
초기 화면은 구글 페이지를 디스플레이합니다.
앞으로, 뒤로 이동할 수 있어야 합니다.

1. 프로젝트 생성
프로젝트, 애플리케이션: WebViewingApp
패키지: android15.samples
액티비티: WebViewingStoryboard
완성된 프로젝트 파일은 아래에 첨부합니다.
 WebViewingApp.zip
2. 메인 폼 작성
2.1 전체에 대한 레이아웃 구상
웹뷰가 화면 전체 영역을 차지합니다.
<LinearLayout xmlns:android="http://schemas.android.com/apk/res/android"
android:layout_width="wrap_content"
android:layout_height="wrap_content"
android:orientation="vertical">
<WebView
android:id="@+id/webview"
android:layout_width="fill_parent"
android:layout_height="fill_parent"
/>
</LinearLayout>
웹뷰에 대한 상세사항은 다음 링크를 참조합니다.
http://android15.tistory.com/164
3. 애플리케이션 초기화면
3.1 웹뷰를 다루는 멤버를 선언합니다.
WebView _webview;
3.2 onCreate 재정의
웹뷰가 자바스크립트를 사용하도록 설정하고, 구글페이지를 로드합니다.
onCreate에 다음을 추가합니다.
_webview.getSettings().setJavaScriptEnabled(true);
_webview.loadUrl("http://www.google.com");
3.3 인터넷 접근허용
웹뷰는 인터넷을 사용해야 합니다. 인터넷은 접근허용을 받아야 하는 것입니다.
매니페스트 파일(AndroidMenifest.xml)을 열고, <menifest> 요소에 다음을 포함합니다.
3.3 애플리케이션을 수행합니다.
다 된 것처럼 보입니다.
그러나 웹페이지의 링크를 클릭해보세요.
우리의 웹뷰가 링크된 페이지를 보여주는 것이 아니라, 안드로이드에 기본으로 설정된 웹 브라우저가 해당 페이지를 보여줍니다.
4. 링크된 페이지가 우리의 웹뷰안에서 로드되게 하기
4.1 웹뷰클라이언트 재정의(WebViewClient)
웹뷰클라이언트 클래스를 확장하는 클래스를 작성하고, shouldOverrideUrlLoading 메소드를 재정의합니다.
true를 리턴함으로 우리의 웹뷰에서 URL을 처리했음을 알립니다.
@Override
public boolean shouldOverrideUrlLoading(WebView view, String url) {
view.loadUrl(url);
return true;
}
}
4.2 웹뷰에 웹뷰클라이언트 설정
Url을 로드하기 앞서, 웹뷰클라이언트를 설정합니다.
onCreate 부분을 아래와 같이 수정합니다.
_webview.setWebViewClient(new HelloWebViewClient());
_webview.getSettings().setJavaScriptEnabled(true);
_webview.loadUrl("http://www.google.com");
4.3 애플리케이션을 수행해봅니다.
위와 같이 했을 경우, 원하는 웹페이지를 로드한 웹뷰가 나타나는 것이 아니라 바탕화면이 검정색으로 보입니다. 바탕화면이 검정색으로 보이는 것은 검정색으로 배경이 설정된 바탕 윈도우만 보이고, 그 위에 보여야할 뷰들이 보이지 않기 때문입니다.
웹뷰를 설정했는데, 보이지 않는다는 것은 어떤 이유인지는 모르지만 웹뷰의 크기가 0이 되었거나 웹뷰를 포함하는 부모의 크기가 0이 되었다는 것을 의미합니다.
헬로뷰 예에서, 웹뷰의 부모인 레이아웃의 너비와 높이가 'wrap_content'로 설정되어 있으니, 만약 레이아웃이 웹뷰의 크기를 측정할 때 웹뷰의 크기가 0으로 계산된다면 부모 레이아웃의 크기도 0이 됩니다.
4.3.1 이 부분이 의심스러우니 레이아웃의 너비와 높이를 'fill_parent'로 설정해 봅니다.
제대로 나옵니다.
정말 웹뷰클라이언트를 설정했을 때 웹뷰의 크기가 커짐에도 불구하고, 레이아웃의 크기가 0이 되는 것인지는 안드로이드 소스코드를 까봐야겠네요.
5. 앞으로, 뒤로 이동에 대한 시나리오 구현
왼쪽 키를 누르면 뒤로, 오른쪽 키를 누르면 앞으로 가게 합니다.
다음과 같이 HelloWebViewClient의 shouldOverrideKeyEvent를 재정의합니다.
public boolean shouldOverrideKeyEvent (WebView view, KeyEvent event) {
int keyCode = event.getKeyCode();
if ((keyCode == KeyEvent.KEYCODE_DPAD_LEFT) && _webview.canGoBack()) {
_webview.goBack();
return true;
}
else if ((keyCode == KeyEvent.KEYCODE_DPAD_RIGHT) && _webview.canGoForward()) {
_webview.goForward();
return true;
}
return false;
}
[Source] SD 카드에 저장되어 있는 비디오 목록 출력및 비디오 실행하기

The folowing example used to list all the video files stored in SDcard and you can
play the video by selecting the file from list.
AndroidManifest.xml
--------------------
<?xml version="1.0" encoding="utf-8"?>
< manifest xmlns:android="http://schemas.android.com/apk/res/android"
package="sample.video" android:versionCode="1" android:versionName="1.0.0">
< uses-permission android:name="android.permission.MOUNT_UNMOUNT_FILESYSTEMS" />
< application android:icon="@drawable/icon" android:label="@string/app_name">
< activity android:name=".VideoActivity" android:label="@string/app_name">
< intent-filter>
< action android:name="android.intent.action.MAIN" />
< category android:name="android.intent.category.LAUNCHER"/>
< /intent-filter>
</activity>
< activity android:name=".ViewVideo">
< intent-filter>
< action android:name="android.intent.action.VIEW" />
< category android:name="android.intent.category.DEFAULT" />
</intent-filter>
</activity>
</application>
</manifest>
main.xml
--------
<?xml version="1.0" encoding="utf-8"?>
< LinearLayout xmlns:android="http://schemas.android.com/apk/res/android"
android:orientation="vertical" android:layout_width="fill_parent"
android:layout_height="fill_parent">
< ListView
android:id="@+id/PhoneVideoList"
android:layout_width="fill_parent"
android:layout_height="fill_parent"/>
</LinearLayout>
VideoActivity.java
-------------------
package sample.video;
import android.app.Activity;
import android.content.Context;
import android.content.Intent;
import android.database.Cursor;
import android.os.Bundle;
import android.provider.MediaStore;
import android.view.View;
import android.view.ViewGroup;
import android.widget.AdapterView;
import android.widget.BaseAdapter;
import android.widget.ListView;
import android.widget.TextView;
import android.widget.AdapterView.OnItemClickListener;
public class VideoActivity extends Activity {
private Cursor videocursor;
private int video_column_index;
ListView videolist;
int count;
/** Called when the activity is first created. */
@Override
public void onCreate(Bundle savedInstanceState) {
super.onCreate(savedInstanceState);
setContentView(R.layout.main);
init_phone_video_grid();
}
private void init_phone_video_grid() {
System.gc();
String[] proj = { MediaStore.Video.Media._ID,
MediaStore.Video.Media.DATA,
MediaStore.Video.Media.DISPLAY_NAME,
MediaStore.Video.Media.SIZE };
videocursor = managedQuery(MediaStore.Video.Media.EXTERNAL_CONTENT_URI,
proj, null, null, null);
count = videocursor.getCount();
videolist = (ListView) findViewById(R.id.PhoneVideoList);
videolist.setAdapter(new VideoAdapter(getApplicationContext()));
videolist.setOnItemClickListener(videogridlistener);
}
private OnItemClickListener videogridlistener = new OnItemClickListener() {
public void onItemClick(AdapterView parent, View v, int position,
long id) {
System.gc();
video_column_index = videocursor
.getColumnIndexOrThrow(MediaStore.Video.Media.DATA);
videocursor.moveToPosition(position);
String filename = videocursor.getString(video_column_index);
Intent intent = new Intent(VideoActivity.this, ViewVideo.class);
intent.putExtra("videofilename", filename);
startActivity(intent);
}
};
public class VideoAdapter extends BaseAdapter {
private Context vContext;
public VideoAdapter(Context c) {
vContext = c;
}
public int getCount() {
return count;
}
public Object getItem(int position) {
return position;
}
public long getItemId(int position) {
return position;
}
public View getView(int position, View convertView, ViewGroup parent) {
System.gc();
TextView tv = new TextView(vContext.getApplicationContext());
String id = null;
if (convertView == null) {
video_column_index = videocursor
.getColumnIndexOrThrow(MediaStore.Video.Media.DISPLAY_NAME);
videocursor.moveToPosition(position);
id = videocursor.getString(video_column_index);
video_column_index = videocursor
.getColumnIndexOrThrow(MediaStore.Video.Media.SIZE);
videocursor.moveToPosition(position);
id += " Size(KB):" + videocursor.getString(video_column_index);
tv.setText(id);
} else
tv = (TextView) convertView;
return tv;
}
}
}

ViewVideo.java
---------------
package sample.video;
import android.app.Activity;
import android.content.Intent;
import android.os.Bundle;
import android.widget.MediaController;
import android.widget.VideoView;
public class ViewVideo extends Activity {
private String filename;
@Override
public void onCreate(Bundle savedInstanceState) {
super.onCreate(savedInstanceState);
System.gc();
Intent i = getIntent();
Bundle extras = i.getExtras();
filename = extras.getString("videofilename");
VideoView vv = new VideoView(getApplicationContext());
setContentView(vv);
vv.setVideoPath(filename);
vv.setMediaController(new MediaController(this));
vv.requestFocus();
vv.start();
}
}
안드로이드 암시적 인텐트(Implicit Intent)를 사용해보자!
- 전화번호 입력(Dial)
- 전화 걸기 (Call)
- 오디오 파일 불러오기
- 전화번호부 데이터 불러오기
01.package com.androidhuman.IntentTester; 02. 03.package com.androidhuman.IntentTester; 04. 05.import android.app.Activity; 06.import android.content.Intent; 07.import android.net.Uri; 08.import android.os.Bundle; 09.import android.util.Log; 10.import android.view.View; 11.import android.view.View.OnClickListener; 12.import android.widget.Button; 13. 14.public class IntentTester extends Activity { 15. /** Called when the activity is first created. */16. @Override17. public void onCreate(Bundle savedInstanceState) { 18. super.onCreate(savedInstanceState); 19. setContentView(R.layout.main); 20. 21. Button callButton = (Button)findViewById(R.id.callbutton); 22. Button dialButton = (Button)findViewById(R.id.dialButton); 23. Button getAudioButtonWithChooser = (Button)findViewById(R.id.getAudioButtonWithChooser); 24. Button getAudioButton = (Button)findViewById(R.id.getAudioButton); 25. Button getContactsButton = (Button)findViewById(R.id.getContactsButton); 26. 27. callButton.setOnClickListener(new OnClickListener(){ 28. 29. public void onClick(View v) { 30. Intent i = new Intent(Intent.ACTION_CALL); 31. i.setData(Uri.parse("tel:0101234567")); 32. startActivity(i); 33. } 34. 35. }); 36. 37. dialButton.setOnClickListener(new OnClickListener(){ 38. 39. public void onClick(View v) { 40. Intent i = new Intent(Intent.ACTION_DIAL); 41. i.setData(Uri.parse("tel:0101234567")); 42. startActivity(i); 43. } 44. 45. }); 46. 47. getAudioButton.setOnClickListener(new OnClickListener(){ 48. 49. public void onClick(View v) { 50. Intent i = new Intent(Intent.ACTION_GET_CONTENT); 51. i.setType("audio/*"); 52. startActivityForResult(i, 0); 53. } 54. 55. }); 56. 57. getAudioButtonWithChooser.setOnClickListener(new OnClickListener(){ 58. 59. public void onClick(View v) { 60. Intent i = new Intent(Intent.ACTION_GET_CONTENT); 61. i.setType("audio/*"); 62. startActivityForResult(Intent.createChooser(i, "Select Audio Source..."), 0); 63. } 64. 65. }); 66. 67. 68. getContactsButton.setOnClickListener(new OnClickListener(){ 69. 70. public void onClick(View v) { 71. Intent i = new Intent(Intent.ACTION_PICK); 72. i.setData(Uri.parse("content://contacts/phones")); 73. startActivityForResult(i,0); 74. } 75. 76. }); 77. } 78. 79. protected void onActivityResult(int requestCode, int resultCode, Intent data){ 80. super.onActivityResult(requestCode, resultCode, data); 81. if(resultCode == RESULT_OK){ 82. Log.i("IntentTester", data.getData().toString()); 83. } 84. } 85.}01.<?xml version="1.0" encoding="utf-8"?> 02.<LinearLayout xmlns:android="http://schemas.android.com/apk/res/android"03. android:orientation="vertical"04. android:layout_width="fill_parent"05. android:layout_height="fill_parent"06. > 07. 08.<Button android:layout_height="wrap_content" 09. android:id="@+id/callbutton" 10. android:layout_width="fill_parent" 11. android:text="action : ACTION_CALL / data : tel:0101234567"></Button> 12. 13.<Button android:layout_height="wrap_content" 14. android:layout_width="fill_parent" 15. android:id="@+id/dialButton" 16. android:text="action : ACTION_DIAL / data : tel:0101234567"></Button> 17. 18.<Button android:layout_height="wrap_content" 19. android:layout_width="fill_parent" 20. android:id="@+id/getAudioButton" 21. android:text="action : ACTION_GET_CONTENT / type : audio/*"></Button> 22. 23.<Button android:layout_height="wrap_content" 24. android:layout_width="fill_parent" 25. android:text="action : ACTION_GET_CONTENT / type : audio/* / with Chooser" 26. anddroid:id="@+id/getAudioButtonWithChooser"></Button> 27. 28.<Button android:layout_height="wrap_content" 29. android:layout_width="fill_parent" 30. android:id="@+id/getContactsButton" 31. android:text="action : ACTION_PICK / data : content://contacts/phones"></Button> 32.</LinearLayout>

01.callButton.setOnClickListener(new OnClickListener(){ 02. 03. public void onClick(View v) { 04. Intent i = new Intent(Intent.ACTION_CALL); // 전화를 거는 액션 05. i.setData(Uri.parse("tel:0101234567")); // 전화번호를 인텐트에 넣어줍니다. 06. startActivity(i); // 해당 인텐트를 처리하는 액티비티 (Dialer) 실행 07. } 08. 09. }); 10. 11. dialButton.setOnClickListener(new OnClickListener(){ 12. 13. public void onClick(View v) { 14. Intent i = new Intent(Intent.ACTION_DIAL); // 전화번호를 입력하는 액션 15. i.setData(Uri.parse("tel:0101234567")); // 전화번호를 인텐트에 추가합니다. 16. startActivity(i); // 해당 인텐트를 처리하는 액티비티 (Dialer) 실행 17. } 18. 19. });
 
| ||||||||||||||||||||||||||||||||||||||||||||||||||||||||


 |
 |
01.getAudioButton.setOnClickListener(new OnClickListener(){ 02. 03. public void onClick(View v) { 04. Intent i = new Intent(Intent.ACTION_GET_CONTENT); 05. i.setType("audio/*"); 06. startActivityForResult(i, 0); 07. } 08. 09. });
01.getAudioButtonWithChooser.setOnClickListener(new OnClickListener(){ 02. 03. public void onClick(View v) { 04. Intent i = new Intent(Intent.ACTION_GET_CONTENT); 05. i.setType("audio/*"); 06. startActivityForResult(Intent.createChooser(i, "Select Audio Source..."), 0); 07. } 08. 09. });
01.getContactsButton.setOnClickListener(new OnClickListener(){ 02. 03. public void onClick(View v) { 04. Intent i = new Intent(Intent.ACTION_GET_CONTENT); 05. i.setType("vnd.android.cursor.item/phone"); 06. startActivityForResult(i,0); 07. } 08. 09. });
전화번호부 액티비티가 호출된 화면
DDMS에 선택한 주소록 데이터의 주소가 표시됩니다.
1.Intent i = new Intent(Intent.ACTION_GET_CONTENT); 2. i.setType("vnd.android.cursor.item/phones"); 3. startActivityForResult(i,0);Intent i = new Intent(Intent.ACTION_GET_CONTENT); // ACTION_GET_CONTENT 액션을 사용하는 경우 i.setType("vnd.android.cursor.item/phone_v2"); startActivityForResult(i,0); Intent i = new Intent(Intent.ACTION_PICK); // ACTION_PICK 액션을 사용하는 경우 i.setData(Uri.parse("content://com.android.contacts/data/phones")); startActivityForResult(i,0);
위의 코드를 사용한 경우 |

1.6 버전용 코드를 사용한 경우 |
 Prev
Prev
